
I spent 15 years learning the hard way about fire safety in the backcountry.After melting three tarps and having one close call with sparks, I figured out what actually works.
Can you put a tarp over a fire? Yes, you can safely put a tarp over a fire if you use fire-resistant materials like heavy canvas, maintain proper height (6-8 feet minimum), keep flames under 16 inches high, and monitor sparks constantly.
The difference between a cozy rain shelter and a disaster comes down to material choice and setup technique.
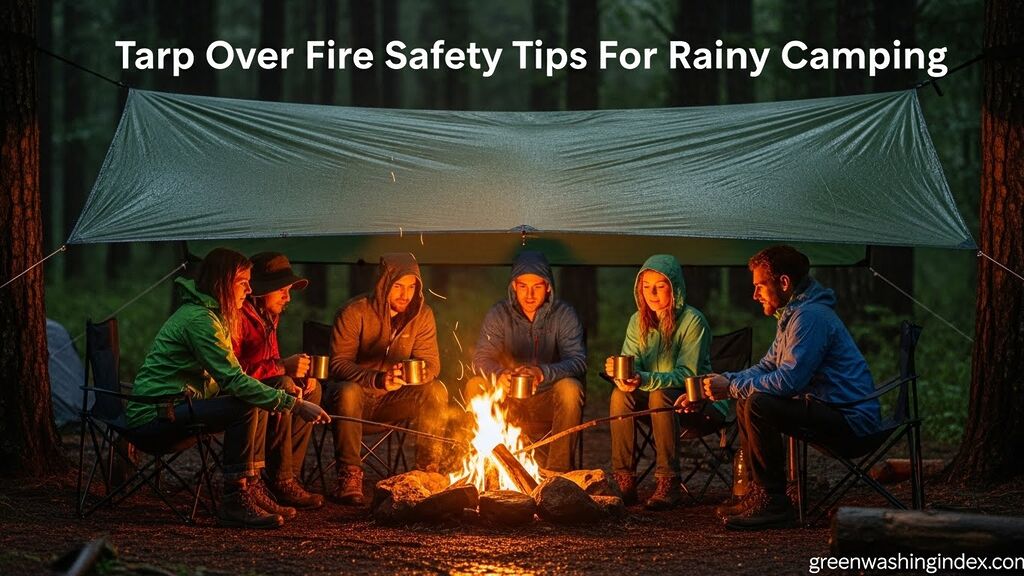
A tarp over fire setup creates a covered area where you can cook, stay warm, and socialize during rain. The key is managing three things: heat radiation, flying sparks, and flame height.
Heat rises and spreads outward, so your tarp needs height and clearance. Sparks are unpredictable and can travel 4-6 feet upward in windy conditions.
I once watched a spark sail 10 feet sideways and land directly on a friend’s sleeping bag under a nearby tree. That experience taught me that spark deflection matters as much as height.
⚠️ Critical Warning: Never use nylon or standard polyethylene tarps directly over open flames. These materials can melt or ignite within seconds of contact with sparks or sustained heat exposure.
| Material | Fire Resistance | Best Use | Spark Tolerance |
|---|---|---|---|
| Heavy Canvas (18oz+) | Excellent | Dedicated fire setups | High – naturally resistant |
| Silnylon | Poor | Shelter only | Very Low – melts easily |
| Polyethylene | Fair to Poor | Temporary cover only | Low – can melt from heat |
| Fire-Retardant Treated | Good | Multi-purpose use | Medium – depends on treatment |
| Vinyl-Coated | Fair | Short-term protection | Medium – heat damage possible |
The right equipment makes all the difference between a successful camping trip and a gear-ruining mistake.
I’ve tested dozens of combinations over the years, and these products stand out for actual field performance.

Material: 18 oz canvas
Size: 6x8 finished
Waterproof: Yes
Grommets: Rustproof
This 18-ounce canvas tarp represents what heavy cotton fabric does best around fire. The material density means sparks bounce off instead of burning through.
I’ve used canvas tarps like this over weekend campfires with zero damage even after constant smoke exposure. The weight is noticeable at over 5 pounds, but that mass translates directly to heat and spark resistance.
Waterproof treatment keeps rain out while maintaining the canvas’s natural fire-resistant properties. Rustproof grommets won’t fail when you need them most during setup in wet conditions.
Campers who prioritize fire safety and want a dedicated tarp for cooking and warmth during rainy weather trips.
Backpackers counting every ounce or campers who need ultralight gear for long-distance trekking.

Size: 10x10 feet
Material: 70D ripstop nylon
Special: Reflective polymer
Tie Points: Loops and grommets
This tarp’s aluminized polymer coating does something special for fire setups. The reflective surface sends heat back down toward your seating area instead of absorbing it.
On a November camping trip, I noticed a measurable temperature difference under this versus a standard tarp. The 70D ripstop nylon provides decent durability, though it still demands careful fire management.
At 10×10 feet, the coverage area comfortably accommodates 2-3 people around a small fire. Loop ties combined with reinforced grommets give you multiple configuration options for ridgeline setup.
Cold-weather campers who want maximum heat reflection and coverage for group cooking scenarios.
Anyone planning large fires or those uncomfortable maintaining strict height and distance protocols.

Strength: 550 lb test
Material: 7-strand nylon core
Construction: Mil-Spec Type III
Origin: Made in USA
Paracord is the unsung hero of tarp-over-fire setups. This 550-pound test strength gives you confidence that your ridgeline won’t sag or fail overnight.
I’ve rigged dozens of tarps with this cord, including some that stayed up for week-long camping trips. The military Type III spec means consistent quality batch after batch.
Made-in-USA manufacturing matters when you’re trusting your gear to hold up in wind and weather. The 7-strand nylon core provides the strength needed for high-tension ridgeline applications.
Every camper setting up a tarp over fire – this is essential safety equipment, not optional gear.
Nobody – proper rigging is non-negotiable when suspending weight above open flame.

Size: 60x82 inches
Heat Reflection: 90%
Layers: 3-layer insulated
Features: Waterproof, windproof
This tarp takes a different approach with its 90% heat reflection capability. The three-layer construction creates an effective thermal barrier behind your fire.
I position this as a backing reflector, angled to bounce heat toward the seating area. At 60×82 inches, it works best as a supplemental heat shield rather than your primary overhead cover.
The waterproof and windproof design means it pulls double duty in adverse conditions. Reinforced grommets handle the tension needed for proper reflective angling.
Campers seeking maximum heat efficiency and willing to use multiple tarps for a complete fire shelter system.
Anyone needing a single all-purpose tarp or campers wanting simpler one-tarp setups.

Volume: 22 oz (650 ml)
Form: Spray application
Use: Fabrics and materials
Coverage: Multiple tarps possible
This spray converts standard tarps into fire-resistant gear for a fraction of the cost of dedicated fire tarps. The 22-ounce bottle treated three of my backup tarps with product to spare.
Spray application takes about 15 minutes per tarp with proper coverage technique. I’ve treated everything from nylon tarps to canvas awnings with noticeable improvement in spark resistance.
It won’t make a cheap tarp equal to heavy canvas, but it significantly raises the safety margin. Reapplication after washing is necessary, but the protection lasts through multiple camping trips.
Budget-conscious campers wanting to upgrade existing gear or anyone using tarps for occasional fire setups.
Professionals or frequent users who should invest in purpose-built fire-resistant gear instead.
These measurements come from testing and community consensus across camping forums.
Follow them and you’ll avoid the melted tarp club.
| Fire Size | Minimum Tarp Height | Safe Horizontal Distance | Recommended Material |
|---|---|---|---|
| Small (cooking, 6-8 inch flames) | 5-6 feet | 2 feet from edges | Canvas or treated nylon |
| Medium (warming, 12-16 inch flames) | 6-8 feet | 3 feet from edges | Heavy canvas only |
| Large (group fire, 16+ inch flames) | 8-12 feet | 4+ feet from edges | Heavy canvas, monitor constantly |
✅ Pro Tip: Measure your tarp height before lighting the fire. Once flames are going, smoke makes accurate measurement impossible and you’re less likely to make adjustments.
Follow this step-by-step process for a safe, functional fire shelter.
How you manage your fire matters as much as how you set up your tarp.
Low flames are safer and more practical for cooking. Flames over 16 inches high create unpredictable spark patterns that challenge even the best setups. I prefer hot coal beds for sustained warmth rather than raging fires.
Hardwoods burn hotter and cleaner with less sparking than softwoods. Pine, cedar, and spruce throw sparks that can reach 6-8 feet vertically. Oak, maple, and hickory provide steady heat with minimal spark production.
Wind affects fire behavior more than any other factor. Crosswinds can push flames sideways toward tarp edges.
Strong updrafts increase spark vertical travel distance. Adjust your fire size based on current and forecasted wind conditions.
After years of practice, I’ve developed techniques for common challenges.
Smoke filling your tarp shelter means poor airflow or fire positioning. First, check that your tarp has adequate ventilation gaps at the edges. Second, reposition your fire slightly downwind so smoke exits away from your living space.
Sometimes adjusting your seating area works better than moving the fire.
Rain complicates everything but doesn’t make tarp-over-fire impossible. Use a slightly higher ridgeline (8-10 feet) to account for reduced airflow.
Keep one tarp edge lower to create a draft channel. This angled setup pulls smoke away while maintaining rain protection.
Winter camping demands extra attention to snow loading on your tarp. Periodic snow removal prevents dangerous weight accumulation.
The angle of your tarp becomes even more critical – steeper slopes shed snow more effectively. I use a 45-degree pitch minimum in winter conditions.
Learning from others’ mistakes saves you from making them yourself.
Yes, you can safely put a tarp over a fire if you use fire-resistant materials like heavy canvas, maintain 6-8 feet of height above flames, keep fires under 16 inches high, and constantly monitor for sparks. Never use nylon or standard polyethylene tarps directly over open flames as they can melt or ignite.
Fire can burn through lightweight tarps like nylon or polyethylene within seconds of direct contact. Heavy canvas tarps (18 oz or heavier) resist sparks and small embers but are not fireproof – any tarp can burn if exposed to direct flame contact or large sustained sparks. Proper height and fire management are essential regardless of material.
For small cooking fires with 6-8 inch flames, position your tarp at least 5-6 feet above the fire. Medium warming fires with 12-16 inch flames require 6-8 feet of clearance. Large fires need 8-12 feet of height and should only be used with heavy canvas tarps. Always measure before lighting the fire when you can see clearly.
Heavy canvas tarps (18 oz weight or higher) offer the best natural fire resistance. Fire-retardant treated canvas or vinyl tarps provide additional protection. Canvas treated with commercial fire retardant sprays also works well. Avoid lightweight nylon, polyester, or standard polyethylene tarps which melt easily from spark contact or rising heat.
Sparks can burn through most lightweight tarps like nylon or polyethylene. Heavy canvas tarps resist most sparks but can show small burn holes from repeated spark exposure. Fire-retardant treated tarps offer better spark resistance. The best defense is proper height (6-8 feet minimum) and keeping flames low to minimize spark production.
Canvas is significantly better than poly for fire applications due to its natural fire resistance and density. Heavy canvas (18 oz or more) resists sparks and small embers that would immediately burn through polyethylene tarps. Poly tarps can also melt from rising heat alone, even without direct flame contact. Canvas is the preferred material for any tarp-over-fire setup.
Create ventilation by keeping one tarp edge lower than others to establish a draft channel. Position your fire slightly downwind so smoke exits away from your living area. Maintain adequate gap between ground and tarp edges for air circulation. If smoke fills the space, adjust fire position or tarp angle until smoke flows freely outward.
After three melted tarps and countless nights under canvas, here’s what matters most. Invest in the right material from the start – canvas costs more but saves money in the long run. Practice your setup at home where mistakes don’t matter.
Start small with your fires and scale up only after confirming your setup performs safely. Never become complacent around fire, even with experience. The best tarp-over-fire setup balances comfort with safety margin. Stay warm, stay dry, and stay safe out there.
