

Your central air conditioner works hard to keep your home comfortable, but without regular maintenance, it becomes an energy hog that breaks down when you need it most. I learned this lesson the hard way when my neglected 8-year-old system died during a 95-degree heat wave, costing me $1,400 for emergency repairs that could have been prevented with $180 of annual maintenance. This comprehensive central ac maintenance guide shows you exactly what to do, when to do it, and how to save hundreds on energy bills while extending your system’s life by 5-7 years.
Regular maintenance isn’t complicated. Most tasks take under 30 minutes and require basic tools you already own. The key is knowing which jobs you can handle yourself and when to call a professional. Our team has compiled research from HVAC technicians, government energy guidelines, and real homeowner experiences to create a maintenance plan that actually works. Whether you’re a new homeowner or you’ve been ignoring your AC for years, this guide gives you actionable steps to improve efficiency, prevent breakdowns, and avoid costly surprises.
Before diving into the details, understand that HVAC preventative maintenance follows a simple principle: small, regular investments prevent major failures. The Department of Energy confirms that proper maintenance cuts cooling costs by 15-30% annually. For a typical home spending $300 monthly on summer cooling, that’s $45-$90 saved every month. Over five years, those savings completely offset professional service costs while keeping your warranty valid and your home consistently comfortable.
What maintenance is required for central air conditioning? Homeowners can safely handle filter changes, outdoor unit cleaning, basic coil maintenance, and condensate drain care. These four tasks form the foundation of DIY maintenance and address 80% of preventable AC problems. Let’s break down each one with specific steps anyone can follow.
Dirty filters are the number one cause of AC inefficiency and premature failure. When airflow gets restricted, your system works harder, consumes more electricity, and risks freezing up completely. The good news? Changing your filter takes two minutes and costs $8-$25 depending on the type you choose.
Check your filter monthly during heavy use seasons (summer and winter). Hold it up to a light bulb. If you cannot see light passing through, replace it immediately. For homes with pets, allergies, or dusty environments, monthly replacements are essential. Standard fiberglass filters need changing every 30 days. Pleated filters last 60-90 days. High-efficiency HEPA filters can go 6-12 months but require compatible systems.
To replace your filter, first locate the return air duct, usually near your thermostat or in a central hallway. Turn off your AC at the thermostat. Remove the old filter and note the airflow direction arrows printed on the frame. Slide the new filter in with arrows pointing toward the ductwork (away from you). Mark your calendar for the next change. Buy filters in bulk during sales to save 30-40%.
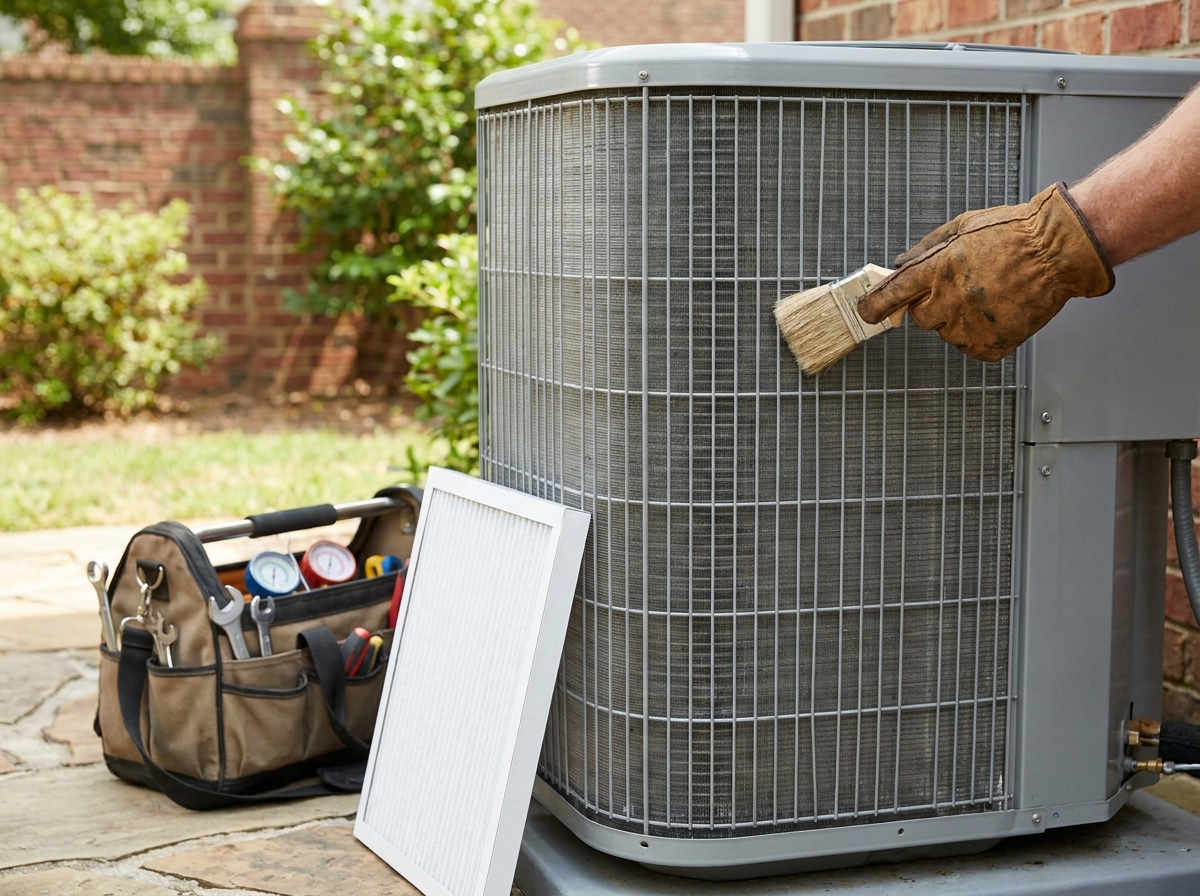
Your outdoor condenser unit sits exposed to leaves, grass clippings, pollen, and debris that block airflow and reduce heat transfer. A dirty condenser forces your compressor to run longer and hotter, eventually leading to failure. Cleaning it yourself twice yearly prevents this damage and takes about 45 minutes.
Start with safety. Locate your electrical disconnect box mounted on the exterior wall near the condenser. It typically has a pull-out handle or switch labeled “ON/OFF.” Pull the handle out completely to cut 240-volt power to the unit. Never rely solely on your indoor thermostat. The disconnect physically isolates the unit from electrical current.
Remove the fan cage by unscrewing the top panel. Use a shop vacuum or soft brush to clear leaves and debris from inside the unit. For the aluminum fins, use a garden hose with a gentle spray nozzle. Spray from the inside outward to push dirt out. Never use a pressure washer. The high pressure bends fins and damages coils. Spray at a 45-degree angle to avoid forcing water deeper into the unit.
Trim vegetation to maintain 24 inches of clearance around all sides of the condenser. Remove any grass, weeds, or shrubs that block airflow. Check the concrete pad beneath the unit. If it has shifted or sunk, call a professional to level it. A tilted condenser strains the compressor and causes refrigerant leaks over time.
The evaporator coil sits inside your air handler or furnace and absorbs heat from indoor air. Dust and dirt accumulation insulates the coil, reducing its ability to cool. While deep cleaning requires professional equipment, you can perform basic maintenance annually to prevent major buildup.
Access the coil by removing the access panel on your indoor unit. This usually requires a screwdriver to remove 4-6 screws. Locate the A-shaped coil assembly. If you see visible dust or debris, use a soft brush or specialized coil cleaning brush to gently sweep the fins. Work carefully. These fins bend easily and restrict airflow when damaged.
For moderate dirt, apply foaming no-rinse coil cleaner available at hardware stores for $8-$12 per can. Spray the foam evenly across the coil surface according to package directions. The foam expands and lifts dirt away, then drains into the condensate pan below. Do not rinse unless the product specifically requires it. Replace the access panel securely to prevent air leaks.
Your AC removes humidity by condensing moisture on the cold evaporator coil. This water drains through a PVC pipe to outside your home or into a floor drain. Algae, mold, and sludge clog this line over time, causing water backups that damage ceilings, walls, and flooring. Cleaning the drain line quarterly prevents expensive water damage repairs.
Locate the drain line where it exits your indoor unit. You’ll see a PVC pipe, usually 3/4 inch diameter, leading to a floor drain or outside. Find the access port, a T-shaped fitting with a removable cap. Remove the cap and check for visible blockages. Pour one cup of white vinegar down the opening. Vinegar kills algae and mold without damaging pipes.
For stubborn clogs, use a wet/dry shop vacuum at the exterior drain exit. Remove the vacuum filter, attach the hose to the blow port, and seal the connection around the drain pipe with a rag. Run the vacuum for 2-3 minutes to suck out blockages. Alternatively, attach the vacuum to suck mode at the exterior end while someone pours water into the indoor access port. You’ll hear gurgling when the clog clears.
Install a safety float switch in the condensate pan if your system doesn’t have one. This $25 device shuts down your AC if water backs up, preventing overflow damage. Check the drain pan beneath the indoor unit for cracks or rust while you’re cleaning. A damaged pan needs immediate replacement to prevent leaks.
Timing your maintenance tasks with the seasons maximizes efficiency and catches problems before extreme weather hits. How often should central AC be serviced? Homeowners should perform monthly filter checks, quarterly drain cleaning, and biannual deep cleaning. Professional service should happen once yearly, ideally in spring before peak cooling season.
As temperatures rise, your AC prepares for its hardest work of the year. Schedule professional maintenance between March and April, before HVAC companies get overwhelmed with emergency calls. This timing ensures your system runs efficiently from day one of hot weather.
Before the technician arrives, perform these DIY tasks. Remove any condenser cover you installed for winter. Clear debris from around the outdoor unit accumulated during cold months. Change your air filter. Test your system by turning it on and letting it run for 15 minutes. Listen for unusual noises and verify cold air flows from all vents.
Walk through your home and check that all vents are open and unblocked by furniture, rugs, or curtains. Verify your thermostat operates correctly. If you have a programmable model, update the schedule for spring temperatures. Set cooling to 78 degrees when home and 85 degrees when away for optimal energy savings.
During heavy cooling months, vigilance prevents mid-season breakdowns. Check your air filter every 30 days. High heat and continuous operation stress components, making clean airflow essential. If your system runs constantly, consider closing blinds on south-facing windows during peak sun hours to reduce cooling load.
Monitor your outdoor unit weekly. Trim grass and weeds that grow into the 24-inch clearance zone. After storms, remove any branches or debris that hit the condenser. Listen for changes in operating sounds. A sudden increase in noise often signals developing problems requiring professional attention.
Watch your energy bills closely. An unexplained 15-20% increase from the previous month suggests efficiency problems. Common culprits include dirty filters, low refrigerant, or duct leaks. Address these quickly to prevent compressor strain that leads to expensive failures.
As cooling demands decrease, prepare your system for the off-season. Perform a thorough outdoor unit cleaning in September. Remove all debris, straighten any bent fins with a fin comb ($10 at hardware stores), and verify the concrete pad remains level. This cleaning prevents corrosion during winter months.
Change your air filter one final time before switching to heating mode. Clean filters help your furnace operate efficiently when temperatures drop. Schedule any needed repairs now rather than waiting until spring. HVAC companies offer better rates and faster service during fall slow seasons.
Decide whether to cover your outdoor unit for winter. Modern condensers resist weather damage and don’t require covers. However, covers prevent debris accumulation if your unit sits beneath trees. If covering, use only breathable mesh covers designed for AC units. Never use plastic tarps. They trap moisture and cause corrosion.
Central AC systems need minimal attention during winter. If you covered the unit, check the cover monthly and clear accumulated snow or ice weight. Heavy loads damage fan blades and compress the unit. Remove the cover temporarily during unusually warm winter days if you need emergency cooling.
Run your AC for 10-15 minutes once per month during winter. This brief operation keeps compressor seals lubricated and prevents refrigerant migration that damages valves. Set your thermostat to cooling mode, lower the temperature below indoor readings, and let the system cycle. Turn it off afterward.
Keep the area around your outdoor unit clear of snow accumulation. Shovel a 24-inch perimeter after heavy storms. Snow blocking airflow causes problems when you restart the system in spring. Check that gutters above the unit drain properly. Icicles or dripping water falling onto the condenser cause freeze damage to fins and coils.
DIY maintenance handles basic upkeep, but some tasks require specialized tools and EPA certification. Knowing the boundary between homeowner maintenance and professional service protects your warranty, ensures safety, and prevents expensive mistakes. Here’s exactly what professionals should handle and when to make the call.
Schedule a professional tune-up every spring, ideally before you need daily cooling. This annual service costs $120-$200 depending on your location and system size. The technician performs tasks impossible for homeowners, including refrigerant level checks, electrical connection tightening, and deep component cleaning.
During a standard tune-up, expect the technician to check refrigerant charge and adjust if needed. They’ll inspect and test the capacitor and contactor, two components that commonly fail and cause complete system shutdowns. The blower motor gets cleaned and lubricated. They’ll measure amperage draws on motors to detect impending failures before breakdowns occur.
The technician should inspect your ductwork for leaks, which can waste 20-30% of conditioned air. They’ll verify thermostat calibration and program settings if you have a smart model. Condensate pans and drains get professional-grade cleaning. Some companies include indoor air quality testing or provide detailed efficiency reports showing your system’s SEER performance.
Certain symptoms indicate serious problems requiring immediate professional attention. If you notice any of these, shut off your system and call a technician. Continuing to run a failing AC causes cascading damage that multiplies repair costs.
Ice buildup on your indoor coil or refrigerant lines signals low refrigerant charge or severe airflow restriction. While you can check for dirty filters yourself, refrigerant issues require EPA-certified technicians. Running the system with low refrigerant burns out compressors, turning a $200 refrigerant charge into a $1,500 compressor replacement.
Strange noises demand investigation. Buzzing often indicates electrical problems with the capacitor or contactor. Clicking that continues after startup suggests a failing relay or control board. Grinding or squealing from the outdoor unit means motor bearing failure or compressor damage. Rattling typically indicates loose panels or debris inside the unit.
Water leaks around your indoor unit indicate condensate drain blockage or pan failure. While you can clear simple clogs, persistent leaks suggest cracked pans or damaged pumps requiring replacement. Electrical burning smells or visible smoke require immediate shutdown and emergency service. These indicate overheating components or wiring failures that create fire hazards.
If your system blows warm air despite correct thermostat settings, first check that your outdoor unit runs. If the indoor blower works but the outdoor unit stays silent, you likely have an electrical or compressor problem. Troubleshoot cooling problems using our detailed guide, but call a professional if basic checks don’t restore function.
Understanding typical service costs helps you budget appropriately and recognize fair pricing. Standard diagnostic service calls range from $75-$150 depending on your location and time of day. This fee covers the technician’s travel time and initial system inspection. Many companies waive this fee if you proceed with repairs.
Common repairs and their typical costs include: capacitor replacement ($150-$300), contactor replacement ($175-$350), blower motor repair ($300-$600), refrigerant leak repair ($400-$1,500 depending on leak location), and compressor replacement ($1,200-$2,800). These prices include parts and labor but vary significantly by region and system age.
When calling for service, ask about flat-rate pricing versus hourly billing. Flat rates prevent surprise charges if repairs take longer than expected. Request a written estimate before work begins. Reputable technicians explain exactly what they found, show you damaged components, and present repair options at different price points.
Ask about maintenance agreements when scheduling service. Many companies offer annual plans costing $150-$300 that include priority scheduling, discounted repairs, and waived service call fees. For homes with older systems, these plans pay for themselves quickly. Low pressure switch troubleshooting is often included in professional diagnostic services.
Maintaining your AC is only half the efficiency equation. How you use your system and the conditions in your home dramatically impact energy consumption. These optimization strategies reduce cooling costs by 15-30% without sacrificing comfort.
Your thermostat controls when your AC runs and directly impacts your energy bills. For every degree you raise the thermostat setting, you save approximately 3-5% on cooling costs. The Department of Energy recommends 78 degrees when you’re home and awake, 85 degrees when away, and 82 degrees while sleeping.
Programmable thermostats automate these temperature setbacks. Set schedules matching your daily routine. If you leave for work at 8 AM, program the temperature to rise at 7:30 AM so the system shuts down before you leave. Set it to cool back to 78 degrees 30 minutes before you return home. This timing prevents waste while ensuring comfort upon arrival.
Smart thermostats with learning algorithms optimize further. Models like Nest or Ecobee track your preferences and occupancy patterns, automatically adjusting for maximum efficiency. They also provide energy usage reports showing exactly when your system works hardest. Many utility companies offer rebates of $50-$100 for installing smart thermostats, reducing your payback period to under two years.
Avoid drastic thermostat adjustments. Setting your thermostat to 65 degrees does not cool your home faster. It forces your AC to run longer, increasing wear and energy use. If your home feels humid at 78 degrees, your system may be oversized or have airflow issues requiring professional diagnosis rather than lower temperature settings.
Even the most efficient AC cannot overcome poor home envelope performance. Check that all supply and return vents remain open and unblocked. Closing vents in unused rooms actually increases system pressure and reduces efficiency. Your AC was sized for your entire home’s square footage. Blocking airflow creates imbalances that strain components.
Inspect visible ductwork in attics, crawl spaces, or basements. Look for disconnected sections, gaps at connections, or damaged insulation. DIY sealant work with mastic paste or foil tape costs $20-$40 and prevents conditioned air from escaping. Professional duct sealing with aerosol-based methods costs $1,200-$2,500 but can improve efficiency by 20-30% in homes with significant leakage.
Add insulation to attics if you have less than R-30 coverage. Attic heat radiates downward, forcing your AC to work harder. Insulation upgrades pay for themselves in 3-5 years through reduced cooling and heating costs. Seal air leaks around windows, doors, and utility penetrations with caulk and weatherstripping. These inexpensive fixes prevent hot outdoor air from infiltrating your cooled spaces.
Use ceiling fans to improve comfort at higher thermostat settings. Fans create wind chill effects that make 78 degrees feel like 74 degrees. They cost pennies per day to operate versus dollars for AC runtime. Remember that fans cool people, not rooms. Turn them off when you leave to avoid wasting electricity.
SEER (Seasonal Energy Efficiency Ratio) measures how efficiently your AC converts electricity into cooling. Higher SEER ratings mean lower operating costs. Systems installed before 2006 likely operate at 10 SEER or below. Current minimum standards require 14 SEER, with high-efficiency models reaching 20-25 SEER.
Upgrading from a 10 SEER system to a 16 SEER model reduces cooling costs by approximately 37%. For a home spending $150 monthly on summer cooling, that’s $55 saved every month. Over a 15-year system lifespan, savings total nearly $10,000. Factor these operating costs when deciding between repair and replacement.
However, don’t assume higher SEER always pays off. In moderate climates with short cooling seasons, the premium for ultra-high efficiency may not justify the upfront cost. In hot, humid regions where AC runs six months annually, 18+ SEER systems deliver excellent ROI. Your HVAC contractor should perform load calculations to size new systems correctly. Oversized systems short-cycle, reducing efficiency and comfort despite high SEER ratings.
Before calling for expensive service, perform basic troubleshooting. Many AC problems have simple causes you can fix in minutes. Knowing what to check saves service call fees and restores comfort quickly. Here are the most common issues and step-by-step diagnostics.
When your AC runs but doesn’t cool, start with the obvious. Check your thermostat settings. Ensure it’s set to “COOL” mode and the temperature is below current room temperature. Verify the fan setting reads “AUTO” rather than “ON.” The ON setting runs the blower continuously even when the AC isn’t cooling, circulating room-temperature air.
Next, inspect your air filter. A completely clogged filter restricts airflow so severely that ice forms on coils, blocking heat transfer entirely. Replace the filter if dirty, then turn the system off for 2-3 hours to let ice melt. Restart and check for cooling improvement. If the filter was the problem, cooling should resume normally.
Check your outdoor condenser unit. Is the fan spinning? Is the unit humming? If the indoor blower runs but the outdoor unit stays silent, you likely have an electrical problem, low refrigerant causing protective shutdown, or a failed capacitor. These require professional repair. If the outdoor unit runs but blows hot air, the compressor or reversing valve (in heat pumps) has failed.
Inspect all supply vents throughout your home. If some rooms cool while others stay warm, you may have ductwork issues, zone damper problems, or return air blockages. AC not turning on issues sometimes resolve with these basic checks before you need professional help.
Air conditioners should hum quietly. New or changed noises indicate developing problems. Address these early to prevent catastrophic failures. Here’s what different sounds typically mean.
Buzzing from the outdoor unit usually indicates electrical component problems. The capacitor or contactor may be failing. These parts cost under $50 but cause complete system failure when they quit. Buzzing inside the home suggests relay problems in the air handler. Both situations require professional attention before total failure occurs.
Clicking sounds at startup are normal as the contactor engages. Continuous clicking or rapid clicking indicates the contactor cannot maintain connection or the control board has issues. The system may start briefly then shut off repeatedly. Turn it off to prevent damage and call for service.
Grinding or squealing screams from the outdoor unit mean mechanical failure. Motor bearings may be seizing, or the compressor may be failing internally. Shut down immediately. Continuing to run causes irreversible damage multiplying repair costs by 5-10x. Squealing from the indoor unit suggests blower motor bearing failure or belt problems in older systems.
Rattling typically comes from loose panels, screws, or debris inside the unit. While less serious, loose components can fall into fans or coils causing major damage. Tighten visible screws on exterior panels. If rattling continues inside the unit, call a technician to inspect for loose motor mounts or fan blade problems.
Ice on your indoor evaporator coil or outdoor refrigerant lines indicates serious problems requiring immediate attention. Ice blocks heat transfer completely, making your AC blow warm air while consuming full power. Running a frozen system strains the compressor and risks burnout.
The most common cause is restricted airflow from dirty filters, closed vents, or blocked returns. Turn off your AC completely and switch the fan to ON at the thermostat. This circulates room air over the ice, speeding melting. Check and replace filters. Verify all vents are open and unobstructed. After 2-4 hours, restart the system. If ice reforms, you have deeper issues.
Low refrigerant charge also causes freezing. Refrigerant absorbs heat as it evaporates in the indoor coil. When levels drop, pressure and temperature fall below freezing, causing ice accumulation. Only EPA-certified technicians can legally handle refrigerant. Call for service if cleaning doesn’t resolve freezing.
Malfunctioning expansion valves or blower motors can also cause freeze-ups. These components regulate refrigerant flow and airflow respectively. Both require professional diagnosis and repair. Never attempt to chip ice away manually. You’ll damage delicate aluminum fins. Always allow natural melting.
Water pooling around your indoor unit or dripping from ceiling vents signals condensate system problems. In humid climates, AC systems remove 5-20 gallons of moisture daily. When drainage fails, this water backs up into your home causing thousands in damage.
First, check the condensate drain line as described in the DIY section above. Most leaks result from simple clogs cleared with vinegar or a shop vac. If you’ve cleaned the line but water continues overflowing, the drain pan itself may be cracked or rusted through. Inspect the metal or plastic pan beneath the indoor coil for damage.
Some systems use condensate pumps to move water upward to overhead drains. These pumps fail after 5-10 years. If you hear the pump running constantly or not running at all, replacement is needed. Pumps cost $80-$150 for the part plus installation. Heat pump maintenance guide procedures apply similarly to condensate systems across all cooling equipment types.
Install a float switch if you don’t have one. This safety device sits in the drain pan and shuts down your AC if water levels rise abnormally. The $25 investment prevents ceiling repairs costing $500-$2,000. Many building codes now require float switches on new installations.
Central air conditioners operate on 240-volt electricity and contain high-pressure refrigerant. Mishandling either can cause serious injury or death. These safety rules are non-negotiable. Follow them every time you approach your system.
Before touching any AC component, completely disconnect electrical power. Never rely solely on your thermostat. The low-voltage control circuit can still energize components unexpectedly. You must isolate the high-voltage supply.
Locate your main electrical panel and identify the 240-volt double-pole breaker labeled “AC,” “Condenser,” or “HVAC.” Flip this breaker to OFF. Next, go outside to the condenser unit. Find the weatherproof disconnect box mounted on the wall near the unit. Open the cover and pull out the disconnect handle or switch to OFF. This physically separates the unit from power.
Wait 5 minutes after disconnecting power before touching components. Capacitors store electrical charge even when disconnected and can deliver dangerous shocks. After waiting, use a non-contact voltage tester on capacitor terminals and contactor connections to verify no power remains. If you lack electrical experience, skip any maintenance requiring component contact and call a professional.
Capacitors resemble large batteries with terminals on top. They store energy to help motors start and run. Never touch capacitor terminals. Even discharged capacitors can retain residual charge. If you must work near capacitors during fan cleaning or other tasks, treat them as live electrical components.
The contactor is a relay that switches power to the compressor and condenser fan. It has exposed terminals carrying 240 volts. Never touch these terminals. If the contactor looks burnt, melted, or damaged, don’t attempt replacement yourself. Contactors cost $30-$80 but require correct wiring knowledge to install safely.
Inspect visible wiring annually for damage from rodents, UV exposure, or vibration. Look for cracked insulation, bare copper, or loose connections. If you find damaged wiring, call a professional. Incorrect repairs create fire hazards and violate electrical codes affecting your insurance coverage.
Coil cleaning chemicals are caustic. Foaming cleaners contain alkaline compounds that irritate skin and eyes. Wear safety goggles and chemical-resistant gloves when applying cleaners. Work in ventilated areas. If spray contacts skin, rinse immediately with water for 15 minutes.
Never mix different cleaning products. Some combinations create toxic chlorine gas. Stick with one brand of foaming cleaner. Follow label directions precisely. Some products require rinsing while others don’t. Using water on non-rinse formulas dilutes them, reducing effectiveness and potentially forcing chemical residue into your home’s air.
Fin combs for straightening coil fins have sharp metal teeth. Handle carefully to avoid cuts. When using a garden hose for condenser cleaning, keep pressure below 40 PSI. Higher pressure bends fins, damages coils, and forces water into electrical compartments. Use a gentle spray nozzle, never a pressure washer attachment.
What is the $5000 rule for HVAC? Multiply your system’s age by the estimated repair cost. If the total exceeds $5,000, replacement makes more financial sense than repair. For example, a 12-year-old system needing a $600 compressor repair scores 12 x $600 = $7,200. Since this exceeds $5,000, invest in a new unit instead.
This rule reflects the reality that aging systems require increasingly expensive repairs while delivering declining efficiency. A new 16 SEER system saves $500-$800 annually on energy costs compared to a 10 SEER unit from 15 years ago. Factor these savings into your replacement decision.
DIY maintenance supplies cost $30-$60 annually. This includes two air filters ($8-$25 each), a can of foaming coil cleaner ($8-$12), and white vinegar for drain cleaning ($3). These small investments prevent the vast majority of preventable failures.
Professional annual tune-ups range $120-$200 depending on your location and system complexity. This covers comprehensive inspection, cleaning, and adjustment that maintains manufacturer warranty requirements. Some companies offer maintenance agreements at $150-$300 yearly that include priority service and repair discounts.
Combined, plan $150-$260 total annual maintenance investment. For a system lasting 15 years with proper care, lifetime maintenance costs total $2,250-$3,900. Compare this to the cost of neglect.
Skipped maintenance causes predictable failures with known price tags. Dirty filters and neglected condensers strain compressors, the most expensive component. Compressor replacement costs $800-$1,500 for the part plus $400-$800 labor. Many technicians recommend full system replacement when compressors fail in systems over 10 years old.
Refrigerant leaks develop from vibration, corrosion, and poor installation. Repair costs range $400-$1,500 depending on leak location. Evaporator coil leaks inside the air handler require extensive labor to access and repair. These often total $1,200-$2,500. Condenser coil leaks in the outdoor unit typically run $600-$1,200.
Neglected condensate drains cause water damage averaging $2,500-$5,000 to repair ceilings, walls, and flooring. In severe cases, mold remediation adds $1,000-$3,000. Simple quarterly vinegar treatments prevent this entirely.
Poorly maintained systems last 8-12 years versus 15-20 years for maintained units. Premature replacement costs $4,000-$8,000 for standard efficiency systems, reaching $10,000+ for high-end variable-speed models. The $150-$260 annual maintenance investment prevents $4,000+ early replacement expenses.
Energy waste from neglected systems costs $300-$600 extra annually. Dirty filters, grimy coils, and refrigerant leaks reduce efficiency by 20-40%. Over 10 years, this waste totals $3,000-$6,000 in unnecessary electricity costs. Maintenance pays for itself many times over through energy savings alone.
Central AC maintenance requires monthly filter checks and replacements, quarterly condensate drain cleaning, biannual outdoor condenser cleaning, and annual evaporator coil inspection. Professional service should include refrigerant level checks, electrical connection tightening, capacitor testing, and comprehensive system inspection once yearly.
Homeowners should perform monthly filter inspections and change filters every 30-90 days depending on type. Clean condensate drains quarterly. Deep clean outdoor units in spring and fall. Schedule professional HVAC service once yearly, ideally in March or April before peak cooling season begins.
The $5000 rule helps decide between repair and replacement. Multiply your system’s age by the repair estimate. If the total exceeds $5000, replace the unit. For example, a 10-year-old system needing a $600 repair scores 6000 (10 x 600), exceeding the threshold and indicating replacement makes better financial sense.
Homeowners can safely perform filter changes, outdoor condenser cleaning with a garden hose, condensate drain flushing with vinegar, and visual inspections. However, tasks involving refrigerant, electrical components beyond the disconnect switch, or internal wiring require EPA-certified technicians. Annual professional tune-ups remain essential for warranty compliance and system longevity.
Remove the access cap from the indoor unit’s drain line T-fitting. Pour one cup of white vinegar down the opening to kill algae and mold. For clogs, use a wet/dry vacuum at the exterior drain exit. Attach the vacuum hose to the blow port, seal the connection with a rag, and run for 2-3 minutes to clear blockages. Repeat quarterly.
Modern condensers resist weather damage and typically don’t require covers. However, covers prevent debris accumulation if your unit sits beneath trees. Use only breathable mesh covers designed for AC units. Never use plastic tarps, which trap moisture and cause corrosion. Remove covers during warm winter days and run the system briefly monthly to maintain compressor seal lubrication.
This central ac maintenance guide gives you everything needed to keep your system running efficiently for 15-20 years. The formula is simple: change filters monthly, clean drains quarterly, maintain the outdoor unit biannually, and invest $120-$200 in professional service every spring. These small, consistent efforts prevent the $800-$1,500 compressor failures and $4,000+ premature replacements that destroy budgets.
Your reward for proper maintenance extends beyond cost savings. A well-maintained AC delivers consistent comfort, better humidity control, and cleaner indoor air. Energy bills drop 15-30%, meaning your maintenance investment pays for itself while keeping your home comfortable. Start today by checking your air filter and marking your calendar for seasonal tasks. Your future self will thank you when your AC runs reliably through the hottest days of 2026.
