
Every time you toss a banana peel or coffee filter into the trash, you are throwing away free garden fertilizer. A compost pile takes that everyday organic waste and converts it into dark, crumbly, nutrient-rich material through a natural process called aerobic decomposition. Billions of microorganisms, insects, and fungi do the heavy lifting, breaking down kitchen scraps and yard trimmings into what gardeners affectionately call black gold.
If you have been wondering how to start a compost pile, you are in the right place. According to the EPA, food scraps and yard waste together make up roughly 30 percent of what households throw away. By composting at home, you keep that material out of landfills while producing a powerful soil amendment that feeds plants without synthetic chemicals. This guide walks through every step from choosing a location to harvesting finished compost.
Here is what this guide covers:
Whether you have a large backyard or a small patio, you can turn kitchen waste into plant food. Let us get started.
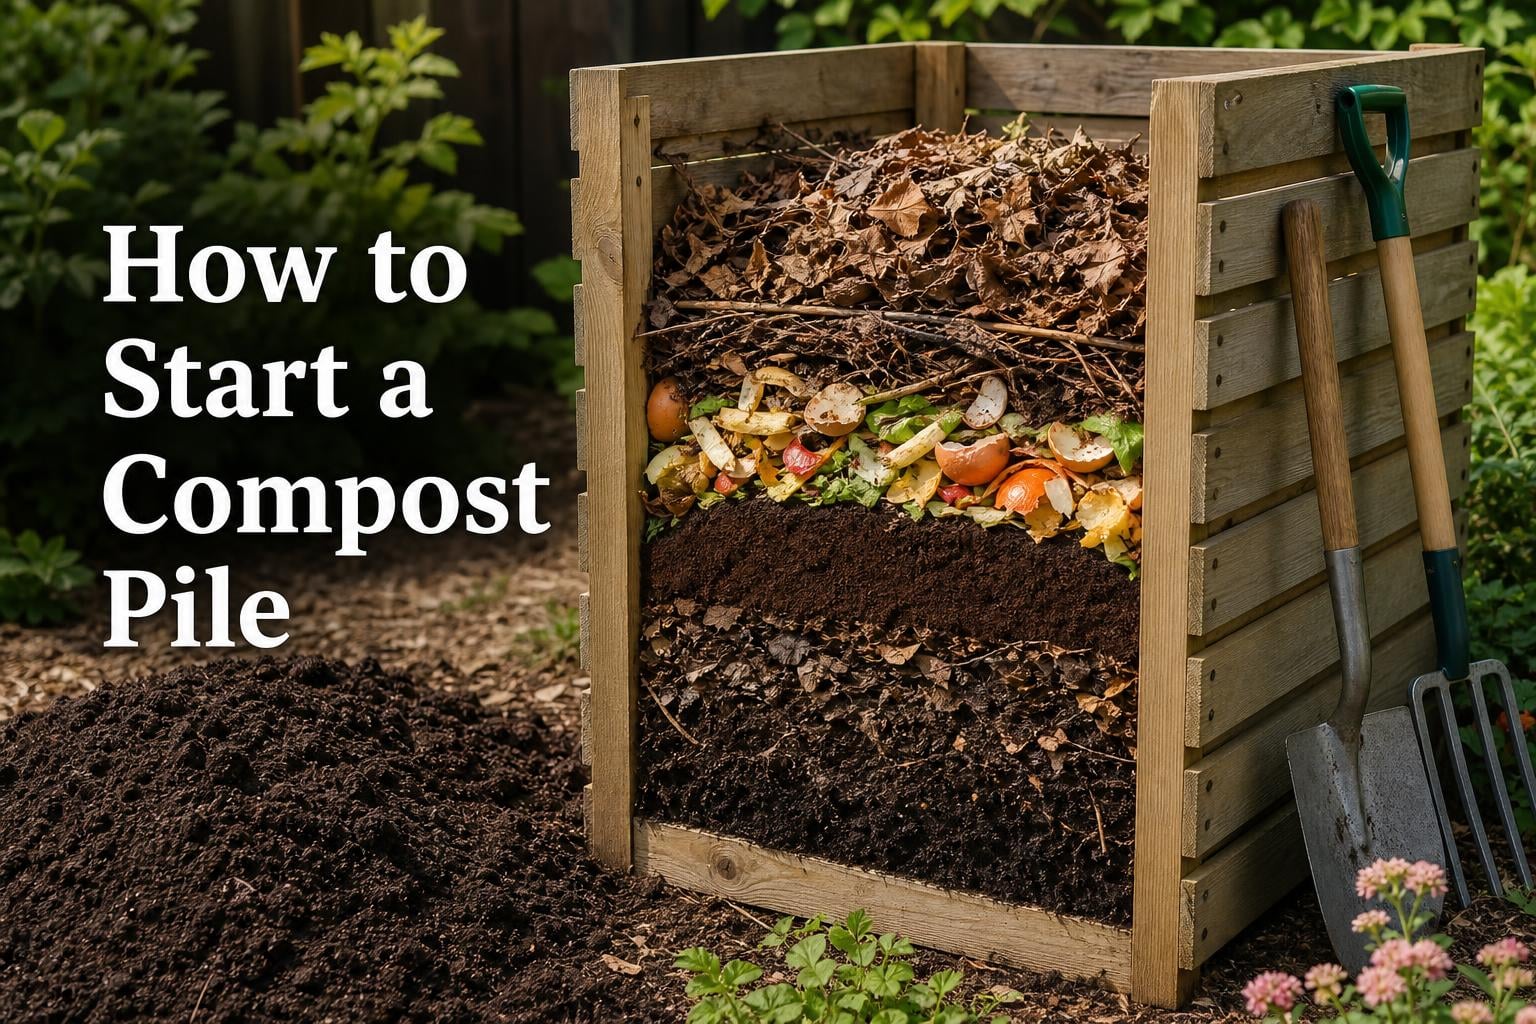
A compost pile is a managed heap of organic materials that decompose over time with the help of oxygen, moisture, and microorganisms. Unlike a random trash pile, a compost pile is deliberately layered and maintained so that thermophilic bacteria, fungi, worms, and beneficial insects can break everything down efficiently. The end result is a dark, earthy substance that looks and smells like rich forest soil.
The science behind it comes down to aerobic decomposition. When oxygen is present, bacteria consume carbon-rich and nitrogen-rich materials, generating heat as a byproduct. A well-built pile can reach internal temperatures between 130 and 160 degrees Fahrenheit, which is hot enough to kill pathogens and destroy weed seeds. This is why hot composting produces safe, clean compost in as little as three to five months, while a neglected cold pile can take a year or more.
The benefits go well beyond free fertilizer. Composting at home reduces methane-producing organic waste in landfills, since food scraps break down anaerobically when buried under trash. Finished compost also improves soil structure, helps sandy soil hold water, and feeds the underground web of organisms that keep gardens healthy. If you care about sustainable gardening or reducing food waste, a compost pile is one of the simplest high-impact habits you can adopt.
Building a compost pile comes down to six straightforward steps. You do not need expensive equipment or specialized knowledge, just the right mix of materials, a bit of water, and regular attention. I have broken the process into clear actions that any beginner can follow.

Step 1: Pick the Right Spot
Choose a location that gets partial sunlight and has decent ground drainage. You want the pile close enough to your kitchen that carrying scraps stays convenient, even on cold or rainy days. A flat, bare-earth surface works better than concrete because soil-dwelling organisms can migrate up into the pile and excess moisture can soak away naturally.
Avoid low spots where rainwater pools after storms, since a waterlogged pile will turn anaerobic and start smelling. If you live somewhere with intense summer heat, a spot that gets morning sun and afternoon shade keeps the pile from drying out too fast.
Step 2: Set Up Your Bin or Open Pile
You can compost in a simple freestanding heap, a DIY bin made from wooden pallets and wire mesh, or a purchased compost bin. Gardeners on Reddit and in university extension guides widely agree that a minimum size of 3x3x3 feet gives the pile enough mass to insulate itself and retain heat. Anything smaller tends to dry out and decompose slowly.
If you prefer to keep things tidy or have neighbors close by, an enclosed bin looks neater and discourages curious wildlife. Whatever container you choose, make sure air can circulate through the sides. Those oxygen-loving microorganisms need airflow to keep decomposition moving.
Step 3: Gather Your Greens and Browns
Compost ingredients fall into two categories. Greens are nitrogen-rich materials like vegetable scraps, coffee grounds, tea leaves, and fresh grass clippings. Browns are carbon-rich materials such as dry leaves, straw, shredded newspaper, cardboard, and small twigs. Both types are essential, and balancing them correctly is the single most important skill in composting.
Aim for roughly three to four parts brown material to one part green material by volume. This carbon to nitrogen ratio, often abbreviated as the C:N ratio, gives microorganisms enough carbon for energy and enough nitrogen to build the proteins they need to multiply. Too much green makes the pile slimy and smelly, while too much brown stalls the process to a crawl.
Step 4: Begin Layering
Start by spreading a four- to six-inch base layer of coarse browns like twigs, wood chips, or dry straw at the bottom. This loose foundation lifts the pile slightly and allows air to circulate underneath, which prevents compaction and keeps the decomposition aerobic. On top of that base, add a layer of green material, then a layer of brown, and repeat the pattern.
This alternating technique is sometimes called lasagna layering because the pile looks like a stacked casserole. Keep each layer between two and four inches thick, and try to keep the overall brown-to-green ratio close to that three-to-one target. Chopping larger items into smaller pieces before adding them speeds things up considerably, since smaller particles have more surface area for microorganisms to attack.
Step 5: Keep It Moist
Moisture is what allows microorganisms to move around, absorb nutrients, and reproduce. The goal is a wrung-out sponge consistency, where the material feels damp to the touch but no water drips out when you squeeze a handful. Every time you add new material, check the moisture level and sprinkle the pile lightly with a hose or watering can if it feels dry.
On the flip side, a pile that is too wet becomes compacted, squeezes out oxygen, and starts producing ammonia and sulfur smells. If your compost is soggy after heavy rain, mix in extra dry brown material like shredded leaves or torn cardboard to absorb the surplus water. A tarp or lid over the pile during wet weather can prevent oversaturation in the first place.
Step 6: Monitor Temperature
A properly built compost pile heats up within a few days as bacteria begin consuming the readily available nitrogen and carbon. The internal temperature should climb to somewhere between 130 and 160 degrees Fahrenheit during the thermophilic phase, which is the peak period of decomposition. You can check this with a compost thermometer, a long-probed dial thermometer that reaches into the center of the pile.
This sustained heat serves an important purpose. It kills off harmful pathogens and destroys weed seeds that might otherwise survive and sprout in your garden later. When you turn the pile, you move material from the cooler outer edges into the hot center so that everything gets a thorough breakdown.
As the active decomposition phase winds down, the temperature gradually drops back to near ambient. Once the center of the pile feels cool to the touch and no longer heats up after turning, the compost is entering its final curing stage. From start to finish, an actively managed hot pile typically takes three to five months to produce finished compost. A neglected or cold pile can take up to a year.
That is the entire process in six steps. With a good location, the right ingredient balance, adequate moisture, and occasional turning, you will have dark, crumbly compost ready for your garden before you know it.
Related Read: Rice Composting: Ultimate Guide to Nutrient-Rich Soil
Think of your compost pile as a recipe where the ingredients determine the quality of the final product. Most organic waste from your kitchen and yard can go in, but some materials work far better than others. Here is a practical reference for what belongs in a healthy, productive pile.
When in doubt, remember that anything that was once alive and does not contain oils, chemicals, or disease can probably be composted. The key is chopping items into small pieces and balancing wet greens with dry browns every time you add material.
Just as important as knowing what goes in is knowing what to keep out. Certain materials attract pests, create foul odors, introduce pathogens, or simply never break down. Avoid adding the following to your compost pile:
Keeping these materials out of your pile prevents most of the problems that discourage new composters. If you stick to plant-based kitchen scraps, yard waste, and carbon-rich paper goods, your pile will stay healthy and productive.
The browns-versus-greens distinction is the heartbeat of composting. Browns supply carbon, which gives microorganisms energy. Greens supply nitrogen, which they use to build proteins and reproduce. Get the balance right and your pile heats up, shrinks, and transforms into rich compost. Get it wrong and you will face slow decomposition, bad smells, or a pile that just sits there doing nothing.
Common brown materials include:
Common green materials include:
The widely recommended ratio is three to four parts browns to one part greens by volume. Some guides simplify this to a two-to-one ratio, while others push toward four-to-one. The exact number matters less than observing how your pile responds. If it smells like ammonia or feels slimy, add more browns. If it is bone-dry and nothing is happening, add more greens and a little water.
One simple habit keeps the ratio on track: every time you dump a container of kitchen scraps (greens) onto the pile, cover them with an equal or greater layer of dry leaves or shredded paper (browns). This single practice prevents odors, deters fruit flies, and keeps decomposition moving steadily.
Related Read: Pistachio Shells Compostability: Breaking the Myths
Once you understand the ingredients, the next question is how to physically set up the pile. Construction covers both where you place it and how you build it up layer by layer. Getting these details right at the start saves you from headaches down the road.
Sunlight is your friend, but only in moderation. A few hours of direct sun each day warms the pile and kickstarts microbial activity. All-day exposure to baking summer sun, however, can dry the pile out rapidly and force you to water it constantly. A location with morning sun and afternoon shade strikes a good balance for most climates.
Drainage matters just as much as sunlight. Bare ground is ideal because earthworms and other beneficial organisms can travel between the soil and the pile freely. If your chosen spot puddles after rain, the base of your pile will stay saturated and turn anaerobic. Slightly elevated ground or a gentle slope prevents this problem.
Think about convenience, too. If the pile is a long trek from the kitchen door, you will eventually stop adding scraps, especially in bad weather. Position it close enough for daily use but far enough from patios and windows that any minor odors stay away from your living spaces. Also consider proximity to a water hose, since you will need to add moisture during dry spells.
Quick checklist for choosing your compost spot:
Building the pile is where the process gets hands-on. Proper layering ensures oxygen flows through the materials and the carbon-to-nitrogen balance stays even throughout the pile. Here is the layering method I follow every time I start a new batch.
1. Lay a base of coarse browns. Start with four to six inches of twigs, wood chips, or dry straw at the bottom. This loose foundation promotes airflow and prevents the pile from sitting in standing water. Keep this layer chunky rather than packed down.
Pro tip: A loose base layer is your defense against soggy, smelly compost. Never compact it.
2. Add a layer of greens. Spread two to four inches of kitchen scraps, coffee grounds, or fresh grass clippings on top of the brown base. These nitrogen-rich materials feed the bacteria that generate heat. Chop larger items into small pieces so they break down faster.
Pro tip: The smaller the pieces, the faster they decompose. Run over leaves with a lawn mower before adding them.
3. Cover with browns. Add another two to four inches of dry leaves, shredded paper, or torn cardboard. This carbon layer balances the nitrogen below it and helps absorb excess moisture from the greens. Always finish a layering session with browns on top to deter fruit flies and mask food odors.
4. Repeat and water. Continue alternating green and brown layers, watering lightly as you go so each layer has that wrung-out sponge feel. Keep stacking until the pile reaches at least three feet tall and three feet wide, which is the minimum size for reliable heat retention.
Pro tip: Keep a bin of dry leaves or shredded cardboard next to your compost pile year-round. Every time you add food scraps, toss a handful of browns on top.
If this sounds intimidating, relax. The pile does not need to be perfect to work. Nature is forgiving, and even a rough approximation of the right ratio will produce compost eventually. Pay attention to how the pile looks and smells, adjust as needed, and you will quickly develop an intuition for what works in your garden.
Related Read: Food Waste Reduction: Simple Tips for Major Impact
One of the first decisions you face is whether to compost in an open pile, a stationary bin, or a rotating compost tumbler. Each approach has advantages, and the right choice depends on your space, budget, and how much effort you want to invest.
Open piles are the simplest and cheapest option. You literally heap material on the ground and let nature take over. Open piles are easy to turn with a pitchfork and can be made as large as you want. The downsides are that they look messy, expose material to rain and wildlife, and lose heat faster than enclosed bins.
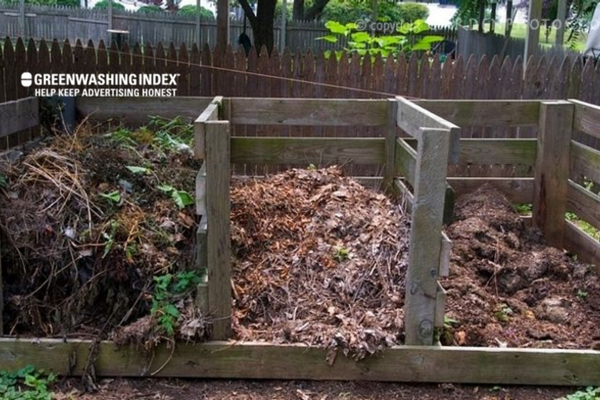
Stationary bins come in wire mesh, wood, plastic, and DIY designs. A classic DIY approach uses four wooden pallets lashed together into a square with hardware cloth lining the inside. Bins keep the pile looking tidy, retain heat and moisture better than an open heap, and discourage many pests. They are the most popular choice for backyard composting.
Compost tumblers are sealed drums mounted on a frame that let you rotate the contents with a crank. Turning becomes effortless, and the enclosed design keeps out rodents and retains moisture precisely. Tumblers tend to be more expensive and have limited capacity, but they are excellent for small yards, decks, or anyone who struggles with heavy turning work.
For beginners with a backyard and a modest budget, a DIY pallet bin or simple wire cylinder is hard to beat. If you have physical limitations or want the cleanest possible setup, a tumbler is worth the investment. For in-depth advice on choosing and setting up a bin, our compost bin setup recommendations cover the most common options.
A compost pile is a living ecosystem, and like any ecosystem it needs occasional attention. The two most important maintenance tasks are turning the pile and managing moisture. Do both consistently and your compost will break down quickly and smell like healthy earth rather than a garbage bin.
Turning the pile means physically mixing the materials so that oxygen reaches every part of it. Oxygen feeds the aerobic bacteria responsible for fast, odor-free decomposition. Without regular turning, the center of the pile uses up its oxygen supply and the process shifts to slow, smelly anaerobic breakdown.
Here is why turning matters so much:
Follow these steps each time you turn:
How often should you turn? For active hot composting, turn every one to two weeks. For a slower, low-effort approach, turning once a month is enough to keep things moving. In warm weather, more frequent turning pays off because bacteria work faster and consume oxygen more quickly.
Even with good habits, problems can crop up. The good news is that almost every compost issue has a simple fix once you identify the cause. Here are the most common problems and exactly what to do about them.
Problem: Bad Odors
If your pile smells like rotten eggs or ammonia, it is usually too wet and too rich in greens. The fix is to add a generous layer of dry browns like shredded leaves, torn cardboard, or sawdust, then turn the pile thoroughly to reintroduce oxygen. A smelly pile is almost always an anaerobic pile.
Problem: Pests and Rodents
Rats, raccoons, and flies are attracted to meat, dairy, oils, and exposed food scraps. The solution is to never add animal products, always bury kitchen waste under several inches of brown material, and use an enclosed bin with a lid if wildlife is persistent.
Problem: Pile Not Heating Up
A cold pile usually lacks nitrogen, moisture, or mass. Add more green material, water lightly if dry, and check that the pile is at least three feet in each dimension. If the pile is too small, it cannot retain the heat that bacteria generate.
Problem: Too Dry and Slow
If the material looks parched and nothing is breaking down, add water gradually while turning. Follow up with a fresh layer of greens to jumpstart microbial activity. In hot climates, covering the pile with a tarp helps retain moisture between waterings.
Problem: Fruit Flies
Fruit flies breed on exposed fruit and vegetable matter near the surface. Always bury food scraps at least four inches deep under brown material. Some gardeners keep a dedicated bucket of dry leaves right next to the pile for this purpose.
Problem: Visible Mold
Some white or gray mold is normal and even beneficial, since fungi help break down tough materials. However, if you notice excessive or unusual mold in your compost, it may signal an imbalance in moisture or aeration that needs attention.
By staying observant and adjusting promptly, you can keep the decomposition process running smoothly. Most problems are caused by too much moisture, too little air, or an ingredient imbalance, and all three are easy to correct.
Related Read: Composting Orange Peels: The Hidden Truth
Here is a quick-reference guide to the most frequent compost pile issues and how to resolve each one at a glance.
Smell of ammonia: Too much nitrogen. Add browns like dry leaves or shredded paper and turn the pile.
Smell of rotten eggs: Too wet and compacted. Mix in dry browns and turn to restore airflow. Check drainage at the base.
Pile not decomposing: Likely too dry, too small, or lacking greens. Add water, add nitrogen-rich material, and build the pile to at least 3x3x3 feet.
Animals digging in the pile: Food scraps are exposed or animal products were added. Bury scraps deep, stop adding meat or dairy, and use a rodent-resistant bin.
Lots of fruit flies: Kitchen waste is too close to the surface. Cover all food scraps with at least four inches of browns.
Pile was hot but cooled down fast: The bacteria ran out of fresh material to consume. Add a new batch of greens and browns, then turn.
After weeks or months of layering, watering, and turning, the payoff arrives: finished compost. Knowing when the material is truly ready prevents you from spreading partially decomposed matter that could rob nitrogen from your plants or introduce unfinished food bits into your beds.
Finished compost looks unlike anything you originally put in the pile. It should be dark brown to nearly black, with a crumbly texture similar to coffee grounds or rich topsoil. You should not be able to recognize individual food scraps, leaves, or other ingredients, though a few stubborn bits of twig or eggshell are fine.
Smell is another reliable indicator. Mature compost has a pleasant, earthy aroma reminiscent of a forest floor after rain. If it still smells sour, ammonia-like, or strongly of decomposing food, it needs more time. A simple test is the squeeze test: grab a handful and squeeze. Finished compost holds its shape briefly before crumbling apart, and it should feel moist but not dripping wet.
Temperature tells the final part of the story. During active decomposition the center of the pile runs hot. When the interior temperature drops to match the surrounding air and no longer rises after turning, the active phase is over. At that point, let the compost cure for two to four weeks. Curing allows the microbial community to stabilize so the finished product is gentle on plant roots.
Timelines vary based on how actively you manage the pile. A hot composting method with regular turning, correct moisture, and the right brown-to-green ratio can produce finished compost in three to five months. Some dedicated gardeners achieve results in as little as six weeks during peak summer heat.
Passive or cold composting, where you simply add material and let it sit without regular turning, takes anywhere from eight months to a full year. The advantage is minimal effort, but the tradeoff is a longer wait and a compost that may still contain viable weed seeds since the pile never reached sterilizing temperatures.
Plan on a brief curing period after either method. Curing means letting the finished material sit undisturbed for two to four weeks so the last stages of microbial stabilization can occur. Skipping the curing step can stress seedlings and transplants, so build this final phase into your timeline.
This is where all your effort pays off. Finished compost is one of the most versatile tools in any garden, and there are many ways to put it to work.
The benefits of using finished compost go beyond nutrition. It improves water retention in sandy soils, reduces compaction in clay, feeds earthworms and beneficial fungi, and helps plants resist disease by supporting a healthy soil food web. Every scoop you spread closes the loop, returning nutrients from your kitchen and yard back to the earth that grew them.
A traditional outdoor compost pile is not the only way to recycle organic waste. Depending on your living situation, you might get better results from one of these alternative methods.
Vermicomposting uses red wiggler worms to consume food scraps and produce castings that are even more nutrient-dense than regular compost. A worm bin can live in a garage, basement, or even under a kitchen sink, making it ideal for apartment dwellers or anyone without yard space. The worms eat fruit and vegetable scraps, coffee grounds, and shredded paper, and they produce rich castings within a few months. Vermicomposting bins are compact, odorless when maintained correctly, and a great option for year-round indoor composting.
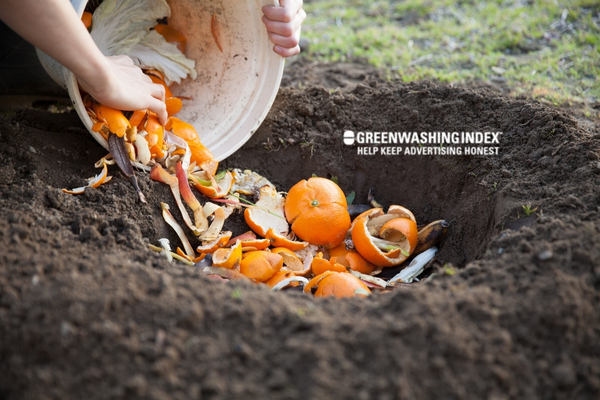
Trench composting is the simplest method of all. You dig a hole or trench roughly twelve inches deep, fill it with kitchen scraps, and cover it completely with soil. Earthworms and soil bacteria handle the rest, breaking everything down directly in the ground where plants can use it. Trench composting requires no bin, no turning, and no equipment beyond a shovel. It is especially useful for burying large amounts of material at once or for prepping a new garden bed between growing seasons.
Bokashi is a Japanese fermentation method that uses specialized bran to pickle kitchen waste in an airtight bucket. Unlike traditional composting, bokashi can handle meat, dairy, and oils because the fermentation process preserves the material rather than decomposing it on the spot. After two weeks of fermentation, the pre-compost is buried in the soil to finish breaking down. Bokashi is fast, compact, and works well as a companion to a traditional outdoor pile.
Composting is not just good for your garden. It is one of the most effective individual actions you can take for the environment. When organic waste goes to a landfill, it gets buried under layers of trash and decomposes without oxygen. That anaerobic process produces methane, a greenhouse gas roughly twenty-five times more potent than carbon dioxide at trapping heat in the atmosphere.
By composting at home, you keep that material in an oxygen-rich environment where it breaks down without generating methane. The finished compost also stores carbon in the soil through a process called carbon sequestration, which keeps that carbon out of the atmosphere for years. On top of that, compost-enriched soil holds significantly more water than depleted soil, which reduces runoff, prevents erosion, and helps gardens survive drought periods.
The EPA also notes that compost-amended soil grows healthier plants that are more resistant to pests and disease, which reduces the need for synthetic pesticides and chemical fertilizers. Those chemicals wash into waterways and contribute to algae blooms and dead zones. Every compost pile, no matter how small, is a tangible step toward a more closed-loop, sustainable food system.
A compost pile is a managed heap of organic materials like kitchen scraps, yard trimmings, and paper that decompose into nutrient-rich soil with the help of microorganisms, oxygen, and moisture. Unlike a random trash pile, it is deliberately layered with carbon-rich browns and nitrogen-rich greens to support aerobic decomposition.
To make a compost pile, choose a well-drained spot with partial sun, lay down a base of coarse browns like twigs, then alternate layers of greens (food scraps, coffee grounds) and browns (dry leaves, shredded paper) at a ratio of about three parts brown to one part green. Keep the pile as moist as a wrung-out sponge and turn it every one to two weeks to add oxygen. A properly built pile heats to 130-160 degrees Fahrenheit and produces finished compost in three to five months.
Yes, placing a compost pile directly on bare earth is actually the recommended approach. Soil contact allows beneficial organisms like earthworms and bacteria to move freely between the ground and the pile, and it provides natural drainage for excess moisture. Avoid placing compost on concrete or asphalt, since those surfaces block drainage and prevent organisms from entering the pile.
For active hot composting, turn the pile every one to two weeks. For a slower, low-effort approach, turning once a month is sufficient. You will know it is time to turn when the internal temperature begins to drop or when the center of the pile no longer feels warm. More frequent turning in warm weather speeds decomposition because bacteria consume oxygen faster at higher temperatures.
An actively managed hot compost pile typically takes three to five months to produce finished compost. A passive or cold pile that is not turned regularly can take eight months to a full year. After the active decomposition phase, allow the finished compost to cure for two to four weeks before using it on plants so the microbial community can stabilize.
A smelly compost pile is almost always too wet and lacking oxygen, which causes anaerobic decomposition. To fix it, add dry brown materials like shredded leaves or torn cardboard to absorb excess moisture, then turn the pile thoroughly to reintroduce air. Avoid adding meat, dairy, or oils, which also cause strong odors.
The widely recommended ratio is three to four parts brown (carbon-rich) material to one part green (nitrogen-rich) material by volume. This carbon to nitrogen balance gives microorganisms the energy and protein they need. If your pile smells like ammonia or feels slimy, add more browns. If it is dry and inactive, add more greens.
Yes, composting continues through winter even in cold climates. While microbial activity slows in freezing temperatures, a properly sized pile of at least 3x3x3 feet can retain enough heat to keep decomposing at the core. Add extra insulation like straw or leaves around the outside, and reduce turning frequency since each turn releases trapped heat.
Learning how to start a compost pile is one of those rare skills that pays you back every single time you use it. You divert waste from landfills, reduce your household methane footprint, and produce a soil amendment that outperforms most store-bought fertilizers, all from materials you would have thrown away anyway.
The fundamentals are straightforward. Pick a spot with partial sun and good drainage. Layer browns and greens at roughly a three-to-one ratio. Keep the pile as moist as a wrung-out sponge. Turn it every week or two to feed oxygen to the microbes doing the work. Keep meat, dairy, oils, and diseased plants out. Wait three to five months for hot composting, or up to a year for a low-effort cold pile. Then harvest, cure, and spread the finished black gold across your garden beds.
The most common mistake beginners make is overthinking it. Your pile does not need perfect ratios, exact measurements, or daily attention to produce results. Start with whatever materials you have, observe how the pile responds, and adjust from there. Composting is forgiving by design, and nature has been doing it for millions of years without instructions.
Your next step is simple: grab a spot in your yard, collect today’s kitchen scraps, and lay down your first layer of browns. In a few months you will have rich, homemade compost feeding your garden for free. If you want to explore specific materials in more depth, check our guides on composting rice, composting orange peels, or recycling egg cartons as brown material. Happy composting.
