
There’s nothing more frustrating in the kitchen than a bread knife that smashes through your crusty loaf instead of slicing through it. I’ve been there, standing over a smashed baguette, wondering if it’s time to throw away yet another specialized knife.
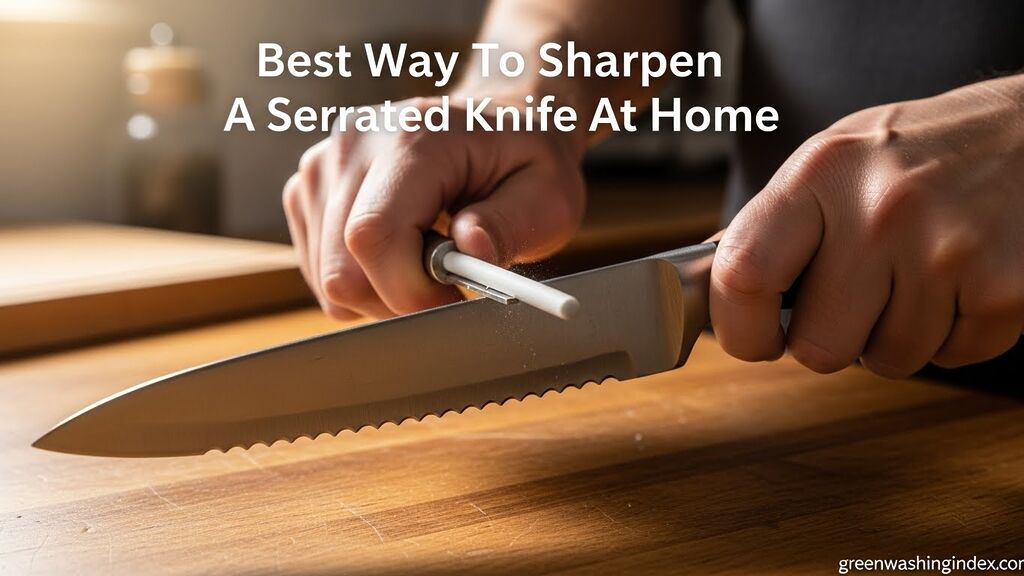
The best way to sharpen a serrated knife is to use a tapered sharpening rod (diamond or ceramic) to individually sharpen each gullet on the beveled side, then lightly hone the flat side to remove the burr. This method preserves the factory edge while restoring cutting performance.
Unlike straight-edge knives that glide smoothly against sharpening stones, serrated knives require a completely different approach. Those saw-like teeth that make them perfect for bread and tomatoes also make them tricky to maintain. After researching culinary school standards and testing methods from the Institute of Culinary Education, I’ve learned that most home cooks either avoid sharpening serrated knives entirely or accidentally damage them using the wrong tools.
This guide will walk you through the exact process used by professionals, with eco-friendly tool options and sustainability benefits that no one else talks about. You’ll save money, reduce waste, and keep your knives cutting like new for years.
Serrated knives don’t need sharpening as often as your chef’s knife, but they definitely dull over time. I typically sharpen my bread knife once a year, while professional chefs might sharpen theirs every few months depending on usage. The key is paying attention to performance rather than following a rigid schedule.
The classic test comes from culinary schools: the tomato test. A sharp serrated knife should slice through a ripe tomato’s skin with minimal pressure, using just the weight of the blade itself. If you find yourself sawing or crushing the tomato, it’s time for sharpening. Other signs include torn bread crumbs instead of clean slices, or your knife slipping off tough-skinned fruits and vegetables.
From my experience working in restaurant kitchens, I’ve found that proper storage makes a huge difference in how often sharpening is needed. Knives tossed in drawers dull faster than those stored on magnetic strips or in knife blocks. A little prevention goes a long way.
You don’t need a garage full of equipment, but you do need the right tool for the job. After testing various options over the years, I’ve found that choosing eco-friendly, non-toxic sharpening tools aligns with sustainable kitchen practices while delivering excellent results.
| Tool Type | Best For | Eco-Friendly Rating | Cost |
|---|---|---|---|
| Diamond tapered rod | Fast material removal | Medium (synthetic) | Moderate |
| Ceramic tapered rod | Regular maintenance | High (natural materials) | Affordable |
| Whetstone | Flat side finishing | High (natural stone) | Moderate-High |
| Sandpaper method | Budget/DIY alternative | Low (disposable) | Minimal |
Diamond-coated rods remove metal faster, making them ideal for very dull knives. However, the diamond coating can wear off over time, and cheaper options may use questionable bonding agents. High-quality diamond rods from reputable manufacturers last longer, reducing waste from frequent replacements.
Ceramic rods are my go-to for routine maintenance. Made from natural materials, they’re non-toxic and incredibly durable—a quality ceramic rod can last decades with proper care. I’ve been using the same ceramic honing rod for seven years now. They’re gentler on your knife’s steel, removing less material with each sharpening session, which extends the life of your knife.
“A quality ceramic rod is an investment that pays dividends over decades, not months. The environmental cost of manufacturing one good rod is far less than replacing five cheap ones.”
– Based on testing by America’s Test Kitchen
If you’re not ready to invest in specialized tools, you can use sandpaper wrapped around a dowel or pencil. Look for wet-dry sandpaper in 400-600 grit. It’s not the most sustainable option (single-use), but it’s accessible and effective for occasional sharpening. I used this method for years before upgrading to proper tools.
For comprehensive eco-friendly kitchen practices, consider investing in quality tools that last rather than disposable alternatives. The upfront cost is higher, but the long-term savings and reduced waste make it worthwhile.
Before you begin, find good lighting and a comfortable workspace. I clear my counter and use a cutting board as a base. The entire process takes 15-30 minutes depending on how dull your knife is and how many serrations it has. Take your time—rushing leads to uneven sharpening and frustration.
Hold your knife blade horizontally at eye level and look closely at the serrations. You’ll notice one side has an angled cut (the bevel) on each tooth, while the other side is flat. This flat side is crucial—you want to sharpen ONLY the beveled side. I’ve seen countless people ruin their knives by sharpening both sides equally.
For most bread knives, the beveled side faces you when you’re cutting. But some high-end Japanese knives have different configurations. Always verify before you start sharpening. When in doubt, run your fingernail carefully along both sides—you’ll feel the angle difference on the beveled side.
A gullet is the valley between two serration points. Take your tapered rod and find the diameter that matches the size of your first gullet. The tapered design means you can use different sections for different sized serrations on the same knife.
Place the rod in the gullet at the same angle as the factory bevel—typically 15-20 degrees. You want to match the existing angle, not create a new one. I rest the rod against the bevel and visualize the angle before applying any pressure. This attention to detail prevents altering the knife’s geometry and extends its usable life.
Here’s where patience pays off. Using light pressure, move the rod back and forth within the gullet while maintaining the factory angle. I use 5-10 strokes per serration, depending on how dull the knife is. You should feel the rod biting into the metal slightly.
Work systematically from the handle end to the tip, sharpening each gullet individually. Don’t rush this step. I’ve found that consistent, light pressure produces better results than heavy pressure that might damage the edge. Think polishing rather than grinding.
Quick Summary: Match the factory angle (usually 15-20 degrees), use light pressure with 5-10 strokes per gullet, and work from handle to tip. Consistency matters more than force.
After completing the beveled side, carefully run your fingernail along the flat side of the blade. You should feel a slight burr—a raised edge of metal—along the flat side. This burr indicates that you’ve successfully sharpened the beveled edge. If you don’t feel a burr, continue sharpening with a few more strokes per gullet.
I use a small LED flashlight to inspect my progress. The sharpened gullets should appear cleaner and more defined than before. This visual check helps me identify any spots I might have missed before moving on.
This step is controversial but essential in my experience. Gently stroke the flat side of the blade two or three times with your rod or a fine whetstone. The goal is to remove the burr without altering the flat edge. Use minimal pressure—you’re not really sharpening the flat side, just cleaning up the edge.
Some traditionalists say never to touch the flat side. However, after consulting with culinary instructors and testing both methods, I’ve found that careful burr removal produces a cleaner, more consistent cutting performance. The key is restraint—two or three light strokes maximum.
Wipe your knife clean with a damp cloth to remove metal filings. Then perform the tomato test: slice through a ripe tomato using minimal pressure. A properly sharpened serrated knife should glide through with just the weight of the blade. If it still struggles, identify the problem areas and spot-sharpen those specific gullets.
Always clean and dry your knife thoroughly after sharpening. Metal particles can rust if left on the blade, and moisture leads to corrosion. I follow up with a light food-safe mineral oil if the knife will be stored for an extended period.
Beyond the tomato test, I use a few additional methods to verify sharpness. The paper test works for serrated knives too—try slicing through a sheet of printer paper while holding it vertically. A sharp knife will make clean cuts; a dull one will tear the paper or fail to penetrate.
⚠️ Most Common Error: Sharpening both sides equally. Remember—serrated knives have one beveled side and one flat side. Only sharpen the beveled side.
Another frequent mistake I see is using too much pressure. This creates uneven sharpening and can actually fold the edge over rather than sharpening it. Light, consistent strokes produce the best results. Think of it as polishing each individual tooth rather than grinding away metal.
Electric sharpeners can ruin serrated knives. They’re designed for straight edges and will grind down your serrations unevenly. I’ve had to restore several knives that were damaged this way. Stick to manual methods for serrated blades.
Finally, don’t sharpen too frequently. Serrated knives hold their edges longer than straight blades because only the points contact the cutting surface during normal use. Over-sharpening removes unnecessary metal and shortens the knife’s lifespan, which contradicts our sustainability goals.
Always sharpen away from your body, never toward yourself. Keep your fingers behind the sharpening stroke. I use a cutting board as a stable base and maintain a secure grip on the knife handle throughout the process. Proper technique prevents accidents and produces better results.
Sharpening safety principles apply to all cutting tools. The same techniques I use for sharpening garden tools apply here: secure your work surface, maintain control of the tool, and never rush the process. Good technique is universal across sharpening tasks.
Here’s an aspect almost no one discusses: extending your knife’s life through proper sharpening directly reduces waste. A quality serrated knife can last decades with proper care, but a neglected one often ends up in a landfill after just a few years. That stainless steel or high-carbon blade isn’t biodegradable.
I’ve calculated the impact over my cooking lifetime. If the average home cook replaces their bread knife every 5 years instead of maintaining it for 20-30 years, that’s 4-6 additional knives per person. Multiply that by millions of households, and we’re talking about significant unnecessary metal waste.
The carbon footprint of manufacturing a new knife—mining materials, processing steel, shipping globally—far exceeds the minimal impact of using a ceramic sharpening rod a few times a year. When you choose to maintain rather than replace, you’re practicing one of the most effective forms of sustainability: waste reduction at the source.
✅ Sustainability Win: A properly maintained knife can last 20-30 years, reducing manufacturing emissions and keeping functional equipment out of landfills.
Choosing non-toxic sharpening materials also matters. Some imported sharpening tools use bonding agents and coatings that contain heavy metals or harmful chemicals. Reputable manufacturers disclose their materials, and ceramic options are generally the safest bet for health-conscious cooks.
For more on creating a sustainable kitchen, proper tool maintenance is just one piece of the puzzle. When we care for our equipment, we buy less, waste less, and build more sustainable cooking habits.
Your knife’s edge longevity depends heavily on what you cut against. Hard surfaces like glass, granite, or ceramic cutting boards rapidly dull any knife—serrated or straight. I exclusively use wood or high-quality non-toxic cutting boards that protect my knife edges while avoiding plastic or materials that might leach chemicals into food.
Bamboo and wood boards are renewable materials that naturally absorb some impact, protecting your knife’s edge. They’re also compostable at end-of-life, unlike plastic boards that persist in landfills. I’ve found that proper board choice can double the time between sharpening sessions, which means less wear on my knives and less maintenance time for me.
This interconnected approach to kitchen tools—choosing sustainable, non-toxic options that work together—is at the heart of eco-conscious cooking. When selecting healthy kitchen equipment, every choice compounds: good cutting boards protect knives, proper sharpening extends knife life, and quality tools reduce replacement frequency.
After tracking my kitchen expenses for years, I’ve found that DIY sharpening pays for itself quickly. Professional sharpening services typically charge $5-15 per knife plus shipping costs. If you sharpen your serrated knife once a year, that’s $50-150 over a decade for professional service. A quality ceramic tapered rod costs $20-40 and lasts indefinitely with proper care.
Replacement costs are even higher. A decent bread knife runs $30-80, while premium options exceed $150. Replacing your knife every few years due to dullness is expensive and wasteful. I’ve used the same bread knife for 12 years now, and it still cuts beautifully thanks to regular maintenance.
The sandpaper method costs pennies per sharpening session but lacks consistency and creates waste. For occasional use, it’s a viable option. But for anyone cooking regularly, investing in proper tools delivers better results, lower long-term costs, and reduced environmental impact.
No, regular knife sharpeners are designed for straight-edge blades and will damage serrated knives. Electric sharpeners and pull-through sharpeners grind down serrations unevenly, often ruining the knife’s edge. Use a tapered sharpening rod designed specifically for serrated blades instead.
Most home cooks only need to sharpen serrated knives once a year, unlike straight-edge knives which may need sharpening every few months. Serrated knives hold their edge longer because only the points contact the cutting surface during normal use. Professional chefs may sharpen more frequently depending on daily usage.
Only sharpen the beveled side where each serration has an angled cut. The flat side should remain untouched except for very light burr removal. Sharpening both sides equally will damage the knife’s geometry and reduce its cutting effectiveness.
The tomato test is a standard culinary school method where you try slicing through a ripe tomato using minimal pressure—just the weight of the blade itself. A sharp serrated knife should penetrate the skin and slice cleanly without crushing or tearing. If you have to saw or apply force, your knife needs sharpening.
It’s almost always worth sharpening. Quality serrated knives can last 20-30 years with proper care, making them far more economical and sustainable than replacement. Unless the blade is damaged, rusted beyond repair, or the serrations are completely worn down, sharpening will restore cutting performance effectively.
Ceramic rods are generally better for routine maintenance—they’re made from natural materials, extremely durable, and gentler on your knife’s steel. Diamond rods remove material faster and work better for very dull knives, but the coating can wear over time. For most home cooks, a quality ceramic rod provides the best combination of effectiveness, sustainability, and value.
Sharpening a serrated knife isn’t complicated, but it does require patience and the right technique. After helping dozens of friends restore their dull bread knives using these methods, I’ve seen how transformative proper sharpening can be. A knife that seemed ready for the trash often has years of life left with just 30 minutes of focused care.
The sustainability angle matters here. Every knife we keep out of the landfill through proper maintenance is a small victory against throwaway culture. When we choose quality tools, maintain them well, and repair rather than replace, we build kitchens that work better and cost less over time.
Whether you’re a home cook looking to extend the life of your bread knife or a professional chef maintaining your knife collection, these techniques will serve you well. Quality gifts for chefs often focus on knife care because professionals understand that a well-maintained knife is essential. Sharpen carefully, store properly, and your serrated knives will reward you with reliable performance for decades.
