

When your lawn mower refuses to start and you hear nothing but silence or a clicking sound when you turn the key, the starter system is often the culprit. I’ve spent countless hours troubleshooting lawn mower starters, and I can tell you that testing one properly can save you hundreds of dollars in unnecessary repairs or replacements. In this comprehensive guide, we’ll walk through every method to test your lawn mower starter, from simple visual inspections to advanced multimeter testing.
Understanding how to test your lawn mower starter isn’t just about fixing a current problem – it’s about developing the knowledge to maintain your equipment properly and catch issues before they leave you stranded with an overgrown lawn. Whether you’re dealing with a riding mower or a walk-behind model with electric start, the testing principles remain similar, though the specific components may vary slightly.
Before we dive into the testing procedures, let me emphasize something crucial: safety must always come first. A lawn mower starter system involves electrical components that can cause serious injury if mishandled. We’ll cover all the necessary safety precautions before touching any tools or components.
To effectively test a lawn mower starter, you need to understand what you’re working with. The starter system consists of several key components that work together to turn your engine over and get it running.
The starter motor itself is an electric motor that engages with the engine’s flywheel to turn the crankshaft. When functioning properly, it provides the initial rotation needed to start the combustion process. This motor receives power from the battery through the starter solenoid, which acts as both a relay and an engagement mechanism.
The starter solenoid serves two critical functions in your mower’s starting system. First, it acts as a heavy-duty relay, allowing the relatively small current from your ignition switch to control the much larger current needed by the starter motor. Second, in many designs, it physically pushes the starter gear (called a bendix) into engagement with the flywheel. When you turn the key, the solenoid receives a signal, closes the circuit to the starter motor, and simultaneously engages the gears.
The battery provides the electrical power for the entire starting system. Most riding mowers use 12-volt batteries similar to those in cars, though smaller in capacity. The battery must maintain sufficient charge and be capable of delivering high current (measured in cold cranking amps or CCA) to turn the starter motor effectively.
The ignition switch is your control interface with the starting system. When you turn the key to the start position, it sends a signal to the starter solenoid to begin the starting process. Modern mowers often include safety switches that must be engaged (such as clutch pedals or blade disengagement switches) before the ignition switch will activate the starter.
All these components are connected by wiring and cables that must be in good condition for the system to function. Corroded connections, damaged wires, or loose terminals can prevent the starter from working even when all major components are functioning properly.
Working with lawn mower electrical systems requires careful attention to safety. I cannot stress enough how important it is to follow these precautions every single time you work on your mower’s starter system.
Always disconnect the spark plug wire before beginning any starter testing. This simple step prevents the engine from accidentally starting while you’re working on it, which could cause severe injury. Pull the wire completely away from the spark plug and secure it so it cannot accidentally make contact.
Remove the key from the ignition switch and keep it in your pocket while working. Even with the spark plug disconnected, the starter motor can still engage if the key is turned, potentially causing injury if your hands or tools are near moving parts.
Wear safety glasses throughout the testing process. Battery acid, electrical sparks, or debris can cause serious eye injury. Additionally, wear work gloves when handling battery terminals and electrical connections to protect against acid burns and electrical shock.
Work in a well-ventilated area, especially when testing the battery or working near it. Batteries can emit hydrogen gas, which is highly flammable. Never smoke or create sparks near the battery, and avoid leaning directly over it when making connections.
Ensure the mower is on level ground with the parking brake engaged (for riding mowers) or the drive disengaged (for self-propelled walk-behind mowers). The mower should be completely stable and unable to move during testing.
Keep a fire extinguisher rated for electrical fires within reach. While rare, electrical problems can cause fires, and being prepared could prevent a minor incident from becoming a disaster.
Before breaking out the multimeter or other testing equipment, start with a thorough visual inspection. Many starter problems can be identified and even fixed with nothing more than your eyes and basic hand tools.
Begin by examining the battery. Look for obvious signs of problems such as corrosion on the terminals, cracks in the case, or bulging sides. Corrosion appears as a white, blue, or green crusty buildup on the battery terminals and cable connections. This corrosion acts as an insulator, preventing proper electrical flow. If you find corrosion, clean it off using a wire brush and a mixture of baking soda and water, then rinse with clean water and dry thoroughly.
Check the battery cables from end to end. Look for fraying, cuts, or burns in the insulation. Pay special attention to where cables pass near hot engine components or moving parts. The cables should be firmly attached at both ends with no play in the connections. A loose connection can prevent sufficient current from reaching the starter motor.
Inspect the starter motor and solenoid visually. Look for signs of overheating such as discolored or melted plastic components, burnt smell, or visible damage to the housing. Check that the starter is securely mounted to the engine – a loose starter can fail to engage properly with the flywheel.
Examine all visible wiring in the starting circuit. trace the wires from the ignition switch to the solenoid, looking for damage, disconnected plugs, or loose connections. On riding mowers, check the safety switch connections at the seat, brake pedal, and blade engagement lever.
Look at the condition of the ground connections. The starter system requires good ground connections to complete the electrical circuit. Find where the negative battery cable connects to the frame or engine block and ensure this connection is clean, tight, and free of paint or corrosion.
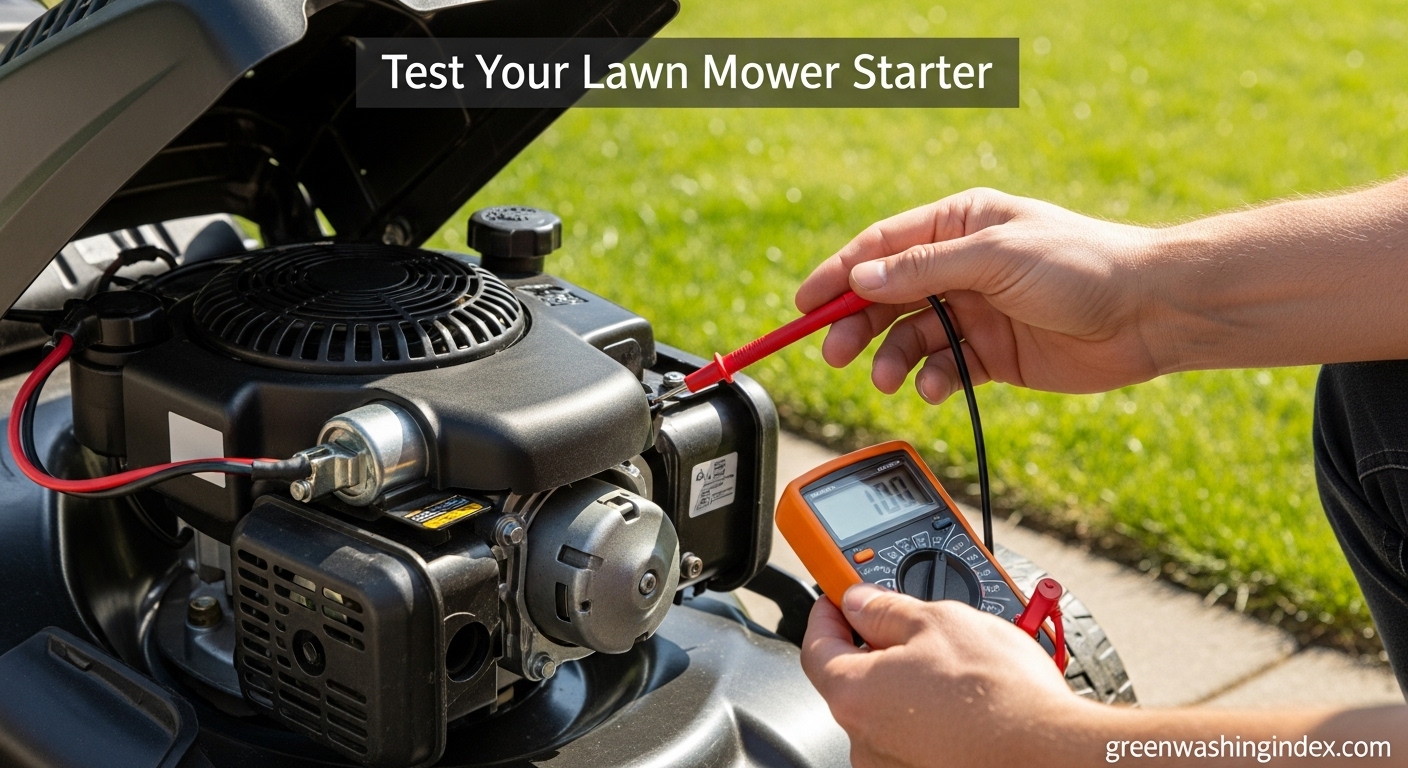
A weak or dead battery is the most common cause of starter problems, so testing battery voltage should be your next step after visual inspection. You’ll need a digital multimeter for accurate readings.
Set your multimeter to DC voltage mode and select a range that includes 12 volts (usually the 20V setting). Touch the red probe to the positive battery terminal and the black probe to the negative terminal. A fully charged 12-volt battery should read between 12.6 and 12.8 volts with no load.
If the battery reads below 12.4 volts, it needs charging before you can properly test the starter system. A reading below 11.8 volts indicates a deeply discharged battery that may not recover even with charging. Batteries showing less than 10 volts are typically beyond recovery and need replacement.
Once you’ve confirmed the battery has adequate charge, perform a load test to see if it can deliver sufficient current. While keeping the multimeter connected, attempt to start the mower (with the spark plug still disconnected for safety). Watch the voltage reading as you turn the key. The voltage will drop during cranking, but it shouldn’t fall below 9.6 volts. If it drops below this threshold, the battery cannot provide enough power for the starter and likely needs replacement.
For a more thorough test, check the battery’s specific gravity using a hydrometer if you have one. This tests the condition of the electrolyte in each cell. All cells should read within 0.050 of each other. A variation greater than this indicates a failing cell, and the battery should be replaced.
Remember that temperature affects battery performance. Cold batteries produce less power, and hot batteries can give false high readings. Ideally, test batteries at room temperature (around 70°F) for the most accurate results.
The jumper cable test bypasses the mower’s wiring and solenoid to test the starter motor directly. This test tells you definitively whether the starter motor itself is functional. Exercise extreme caution during this test, as you’ll be working with high current.
First, ensure the mower is in neutral (for riding mowers) or the blade is disengaged (for all mowers). The spark plug wire must remain disconnected. You’ll need a set of jumper cables and either a good 12-volt battery or another mower with a functioning battery.
Locate the starter motor and identify the main power terminal – this is usually a large stud with a nut where the positive cable from the solenoid connects. Clean this terminal if necessary to ensure good contact.
Connect one end of the red jumper cable to the positive terminal of your power source battery. Then, briefly touch the other end of the red cable to the starter motor’s power terminal. The black jumper cable should connect the negative terminal of the power source to a good ground on the mower’s engine block.
When you make the final connection, the starter should immediately spin. If it spins strongly and smoothly, the starter motor is good, and your problem lies elsewhere in the starting system – likely the solenoid, wiring, or ignition switch. If the starter doesn’t spin, spins slowly, or makes grinding noises, the starter motor itself needs repair or replacement.
This test should be brief – just a second or two is enough to determine if the starter works. Prolonged operation without engaging the flywheel can damage the starter motor.
For the most thorough diagnosis, use a multimeter to test each component of the starting system individually. This methodical approach identifies exactly which component has failed.
The solenoid has two circuits to test: the control circuit (low current) and the power circuit (high current). Set your multimeter to continuity mode or resistance mode (ohms).
First, test the control circuit. Locate the two small terminals on the solenoid – one receives power from the ignition switch, the other typically grounds to the solenoid case. With the multimeter, check for continuity between these terminals. You should read between 3 and 20 ohms of resistance. Infinite resistance indicates an open coil, while zero resistance suggests a shorted coil.
To test the power circuit, check for continuity between the two large terminals (battery input and starter output) while activating the solenoid. You can activate it by applying 12 volts to the control terminals using jumper wires from the battery. When activated, you should have continuity (near zero resistance) between the large terminals. When not activated, there should be no continuity (infinite resistance).
Remove the starter from the mower for bench testing. This allows you to thoroughly test the motor without other variables.
Check the resistance between the starter’s power terminal and the motor case (ground). This tests the motor’s field coils and armature. You should see a low resistance reading, typically between 0.2 and 2 ohms. Infinite resistance indicates an open circuit, while zero resistance suggests a short to ground.
Test the starter’s current draw using a clamp-on ammeter if available. Connect the starter to a battery with jumper cables (secure the starter in a vise first). A properly functioning starter should draw between 60 and 150 amps depending on its size. Excessive current draw (over 200 amps) indicates internal damage, while very low draw suggests worn brushes or poor internal connections.
The ignition switch can fail internally, preventing power from reaching the starter solenoid. With the key removed, disconnect the switch’s wiring harness.
Using your multimeter in continuity mode, test each position of the switch. You’ll need the switch’s wiring diagram (usually available in the mower’s service manual) to know which terminals should have continuity in each position. In the “start” position, there should be continuity between the battery input terminal and the starter output terminal.
The solenoid bypass test helps determine if the solenoid is the problem when the starter won’t engage. This test uses a screwdriver or jumper wire to manually bridge the solenoid’s power terminals.
With the spark plug disconnected and the key in the “on” position (not start), use an insulated screwdriver with a thick shaft to bridge the two large terminals on the solenoid. Be prepared for sparks when you make contact. The screwdriver essentially does what the solenoid’s internal contacts should do – complete the circuit from the battery to the starter.
If the starter spins when you bridge the terminals, the solenoid is faulty and needs replacement. If nothing happens, the problem is likely in the starter motor itself, the battery, or the cable connections.
Exercise extreme caution with this test. The screwdriver will carry full battery current and can become very hot. Never allow the screwdriver to touch any other metal parts while bridging the terminals, as this could cause a dangerous short circuit.
Now that we’ve covered testing methods, let’s look at common problems and their solutions based on symptoms you might encounter.
A clicking sound when you turn the key typically indicates the solenoid is receiving power and trying to engage, but either cannot complete the high-current circuit or the starter cannot turn. First, check battery voltage and connections – this symptom often indicates a weak battery or poor connection. Clean and tighten all connections, especially the ground connections.
If the battery and connections are good, the solenoid’s internal contacts may be worn. You might get temporary success by tapping the solenoid with a hammer while someone turns the key, but this indicates the solenoid needs replacement soon.
When you hear the starter motor spinning but the engine doesn’t turn, the bendix (starter drive gear) isn’t engaging with the flywheel. This could be due to a worn bendix spring, damaged teeth on the bendix or flywheel, or a sticking bendix shaft.
Remove the starter and inspect the bendix mechanism. It should slide freely on its shaft and spring back when released. Clean and lubricate the shaft with penetrating oil. If the bendix teeth are worn or damaged, replace the bendix assembly or the entire starter.
Slow cranking typically indicates insufficient power reaching the starter. Begin by testing battery voltage under load – it may have adequate static voltage but fail under the high current draw of starting.
Check for voltage drop in the cables by measuring voltage at different points while cranking. Place one multimeter probe on the positive battery terminal and the other on the starter’s power terminal while someone turns the key. You shouldn’t see more than 0.5 volts drop. Higher readings indicate resistance in the cables or connections.
Internal starter problems can also cause slow cranking. Worn brushes, a damaged armature, or failing bearings increase internal resistance and reduce the starter’s power. If all external components test good, the starter likely needs rebuilding or replacement.
When the starter works sometimes but not others, look for loose connections, failing safety switches, or a worn ignition switch. Check all connections for security and corrosion. Test each safety switch for proper operation – a failing seat switch or brake switch can cause intermittent problems.
Temperature-related intermittent problems often indicate a failing component. A starter that works when cold but fails when hot may have worn brushes or internal shorts. Conversely, a starter that fails when cold but works when warm might have tight bearings or bushings.
Regular maintenance can prevent many starter problems before they occur. Incorporating these practices into your essential gardening tools maintenance routine will extend the life of your starter system and ensure reliable operation.
Keep battery terminals clean and tight. Check them monthly during the mowing season and clean off any corrosion immediately. Apply a thin coat of dielectric grease or petroleum jelly to the terminals after cleaning to prevent future corrosion.
Maintain proper battery charge, especially during the off-season. A battery tender or trickle charger prevents the battery from deeply discharging during storage, which can permanently reduce its capacity. Disconnect the battery if storing the mower for more than a month without a charger.
Lubricate the bendix mechanism annually with a spray lubricant designed for high-temperature use. This prevents sticking and ensures smooth engagement with the flywheel.
Check and tighten all electrical connections at the start of each mowing season. Vibration from mowing can loosen connections over time, leading to increased resistance and eventual failure.
Keep the starter motor clean and free of grass clippings and debris. Buildup around the starter can cause overheating and premature failure. Use compressed air to blow out debris, being careful not to force material deeper into the motor.
Test the battery at the beginning and end of each season. This helps you identify a weakening battery before it fails completely. Most auto parts stores will test batteries for free if you don’t have the equipment.
Deciding whether to repair or replace a faulty starter component depends on several factors including cost, availability of parts, and your mechanical skills.
Batteries should typically be replaced rather than repaired. Modern sealed batteries cannot be serviced, and even older serviceable batteries rarely benefit from attempts at restoration. If a battery is more than three years old and showing signs of weakness, replacement is usually the most cost-effective option.
Starter solenoids are generally replaced rather than repaired. While it’s possible to disassemble and clean the internal contacts, the labor involved often exceeds the cost of a replacement solenoid. Additionally, if the contacts are worn enough to cause problems, cleaning provides only temporary relief.
Starter motors can sometimes be economically rebuilt, especially on larger riding mowers where replacement starters are expensive. Rebuilding typically involves replacing brushes, bearings, and the bendix assembly. If you’re comfortable with the work, a rebuild kit costs much less than a new starter. However, for smaller mowers or when labor cost is considered, replacement often makes more sense.
Wiring and cables should be replaced if damaged. While it’s possible to repair minor insulation damage with electrical tape or heat-shrink tubing, the critical nature of the starting system makes replacement the safer option for any significant damage.
Consider the mower’s overall condition and value when making repair decisions. Investing in expensive starter system repairs for an old mower with other problems may not be economical. Sometimes, persistent starter problems indicate it’s time to upgrade to newer equipment.
While testing a lawn mower starter is within reach of most DIY enthusiasts, certain situations warrant professional help.
Seek professional assistance if you’re uncomfortable working with electrical systems. The high current involved in starter systems can cause serious injury if mishandled. There’s no shame in prioritizing safety over saving money on repairs.
Professional diagnosis makes sense when you’ve tested everything and still can’t identify the problem. Experienced technicians have specialized tools and knowledge to diagnose complex electrical issues that might not be apparent through basic testing.
Consider professional help for riding mowers under warranty. DIY repairs might void your warranty, making professional service the smarter choice even if you’re capable of doing the work yourself.
If you need specialized tools you don’t own and won’t use again, professional service might be more economical. For example, a proper battery load tester or armature growler for testing starter motors can be expensive for one-time use.
Different seasons present unique challenges for starter systems, and your testing approach should account for these variations.
Spring startup after winter storage often reveals starter problems. Batteries may have discharged over winter, and corrosion may have developed on connections. Before the first start of the season, perform a complete visual inspection and battery test. Clean all connections and charge the battery fully before attempting to start.
Summer heat stresses starter components more than any other season. High under-hood temperatures can cause marginal components to fail. If you experience hot-start problems (difficulty starting after the mower has been running), suspect heat-related issues with the starter or solenoid.
Fall preparation should include starter system testing before winter storage. Identifying and fixing problems in fall prevents spring surprises when you need the mower. Test the battery and either disconnect it or connect a battery tender for winter storage.
Winter storage requires special attention to prevent starter system problems. Store batteries in a cool, dry place and maintain their charge. If leaving the battery in the mower, disconnect the negative cable to prevent parasitic drain.
Save money on starter system diagnosis and repair with these practical tips I’ve learned over years of mower maintenance.
Start with the simplest and cheapest possibilities first. Many starter problems are caused by loose or corroded connections that cost nothing to fix beyond a little time and elbow grease. Don’t immediately assume you need expensive replacement parts.
Borrow or rent specialized testing equipment rather than buying it for one-time use. Many auto parts stores loan tools like battery load testers and multimeters for free with a deposit. This gives you access to professional-grade diagnostic equipment without the investment.
Buy replacement parts online or from mower salvage yards for significant savings. OEM starter parts from dealers can be expensive, but aftermarket alternatives often work just as well for half the price. Used parts from salvage yards can be even cheaper, though be sure to test them before installation.
Learn to rebuild rather than replace when economical. Starter rebuild kits typically cost 25-40% of a new starter’s price. With basic tools and patience, rebuilding a starter is a manageable project that can save substantial money.
Group your repairs to save on shipping costs if ordering parts online. If you need a solenoid, consider ordering a spare spark plug, air filter, and other maintenance items at the same time to maximize shipping value.
Common signs of a bad starter include clicking sounds when turning the key, the engine not turning over despite a good battery, grinding noises during starting attempts, or the starter spinning without engaging the engine. Perform the tests outlined in this guide to confirm whether the starter is the problem.
Yes, you can perform several tests with the starter installed, including the jumper cable test, voltage testing, and solenoid bypass test. However, some tests like checking the bendix mechanism or thorough bench testing require removal.
A quality starter should last 5-10 years or more with proper maintenance. Factors affecting lifespan include frequency of use, maintenance practices, storage conditions, and the quality of other electrical system components.
A clicking starter usually indicates the solenoid is receiving power but cannot complete the high-current circuit to the starter motor. This is commonly caused by a weak battery, corroded connections, or worn solenoid contacts.
A starter with an internal short can drain a battery, though this is rare. More commonly, a sticking solenoid that doesn’t fully disengage can cause battery drain. If your battery repeatedly dies, test for parasitic drain with the key off.
The starter motor is the electric motor that physically turns the engine. The solenoid is a relay that controls power to the starter motor and often engages the starter gear with the flywheel. Some mowers have them as separate components, while others integrate them into one unit.
Starter replacement costs vary widely depending on the mower type and whether you do it yourself. DIY replacement typically costs $50-150 for parts. Professional replacement including labor ranges from $150-400 depending on the mower model and local labor rates.
You can jump start a riding mower with a car, but keep the car engine off to avoid damaging the mower’s electrical system with excessive voltage. For electric-start push mowers, use a battery jump pack rather than a car.
Testing a lawn mower starter doesn’t have to be intimidating or expensive. With the systematic approach we’ve covered, you can diagnose most starter problems using basic tools and careful observation. Remember that many starter issues stem from simple problems like corroded connections or weak batteries rather than failed components.
Start with safety precautions and visual inspection, then progress through increasingly detailed tests until you identify the problem. Whether you’re dealing with a clicking solenoid, a spinning starter that won’t engage, or complete starting failure, the testing methods in this guide will help you pinpoint the issue.
Regular maintenance and proper storage practices prevent many starter problems before they occur. By keeping connections clean, batteries charged, and components properly lubricated, you’ll enjoy reliable starting season after season. When problems do arise, you now have the knowledge to diagnose them confidently and make informed decisions about repair or replacement.
Take your time with testing, prioritize safety, and don’t hesitate to seek professional help when needed. Your lawn mower’s starter system is repairable, and with the right approach, you’ll have it running reliably again without breaking the bank.