

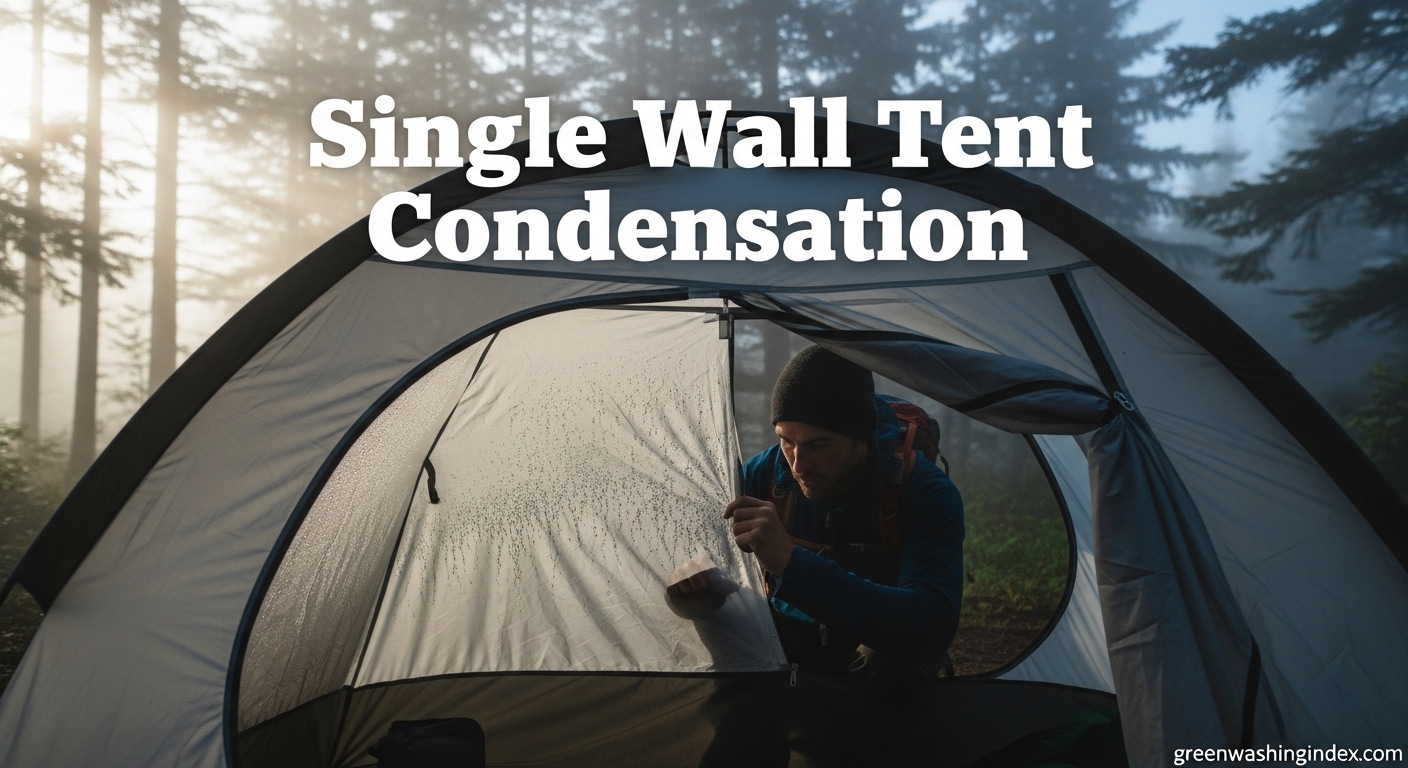
Waking up to water droplets raining on your face at 3 AM is every single-wall tent owner’s nightmare. I’ve spent countless nights damp and frustrated, learning through trial and error what actually works to keep the interior dry.
Preventing condensation in single-wall tents requires managing airflow, site selection, and interior humidity while understanding the physics of moisture. The most effective approach combines strategic ventilation placement, careful campsite selection, and proper gear arrangement.
After testing these techniques across the Pacific Crest Trail, Appalachian Trail, and countless weekend trips, I’ve condensed my learnings into this guide. You’ll find practical strategies that work in real conditions, not just theory.
For more comprehensive gear recommendations including best camping gear options with proper ventilation features, check out our detailed reviews.
Condensation forms when warm, humid air inside your tent hits the cooler fabric surface and reaches its dew point. Water vapor that was invisible as gas suddenly transforms into liquid droplets, creating that dreaded indoor rain.
Every person releases about 0.5 to 1 liter of water per night through breathing and perspiration. In a small single-wall shelter, that moisture has nowhere to go but the fabric walls.
Temperature differential drives this process. When the outside temperature drops at night and your body heat keeps the interior warmer, you create ideal conditions for condensation. The greater the difference between inside and outside temperatures, the more moisture will collect.
Single-wall tents lack the air gap that double-wall designs provide. In a double-wall tent, the inner mesh body allows moisture to pass through to the outer rainfly, keeping you dry. Single walls force moisture to condense directly on the fabric you’re touching.
The dew point temperature determines when condensation occurs. If your tent fabric temperature drops below the dew point of the interior air, water will appear. This is why condensation often worsens in the early morning hours when outside temperatures hit their lowest.
Ground moisture also contributes significantly. Pitching on damp grass or soil releases additional water vapor into your shelter environment. I once camped near a stream in Olympic National Park and woke to half an inch of water on my floor—the ground was literally evaporating into my tent all night.
Humidity levels in your camping location matter immensely. East Coast thru-hikers consistently report more condensation issues than their West Coast counterparts due to higher ambient humidity. The same single-wall tent that performs acceptably in California’s Sierra Nevada might become a misery machine in the Smokies.
Quick Summary: Condensation happens when warm moist air hits cold tent fabric. Your body releases about a liter of water per night, and single-wall tents have nowhere for that moisture to go except back on you and your gear.
Where you pitch matters more than most hikers realize. I’ve seen the same tent have dramatically different condensation levels simply by moving 50 feet.
Choose exposed locations that maximize airflow. Open ridges, saddles, and alpine zones allow wind to sweep moisture away from your shelter. I once camped on a forested ridge in Colorado and woke to walls soaked in condensation, while my partner just 100 yards away on a more exposed knoll stayed nearly dry.
Avoid low-lying areas where cold air settles. Valleys and depressions collect both moisture pockets and colder temperatures—a double whammy for condensation formation. Cold air flows downhill like water, pooling in low points and bringing temperatures down faster at your tent wall.
Dry, rocky outcrops are your friends. Solid surfaces release far less moisture than vegetation. I always scan for granite slabs, gravel bars, or compacted earth before considering grassy spots.
If you must camp on vegetation, choose sparse ground cover rather than thick, lush growth. Healthy, green plants are actively transpiring moisture—essentially sweating into your shelter environment all night.
Saturated ground is a condensation disaster. After rain, soil continues releasing water vapor for hours. I once made the mistake of setting up on what appeared to be dry meadow after a storm, only to discover the soil beneath was still saturated. By midnight, my tent floor was weeping moisture from below.
Balance airflow with weather protection. Some wind through your tent helps, but a gale will flatten your shelter. Look for sites that allow cross-breezes without full exposure to storm winds.
Trees can help or hurt depending on positioning. Camping under a dense canopy reduces radiant cooling and can actually decrease condensation by keeping temperatures more stable. However, trees also block airflow and can drip on you long after rain stops.
I’ve found that camping on the lee side of a ridge or small hill offers the best compromise—you get some wind protection while still maintaining airflow through your tent vents.
East Coast camping demands different strategies than western environments. The humid Appalachian climate means moisture is constantly in the air, regardless of site selection. Many AT thru-hikers abandon single-wall tents after Virginia for this reason.
West Coast conditions are more forgiving. The drier air of the Sierra Nevada and Cascade ranges gives condensation less raw material to work with. PCT hikers generally report fewer issues with single walls despite similar temperature differentials.
Desert environments present unique challenges. While the air is dry, extreme temperature swings—sometimes 40 degrees between day and night—create massive differentials that drive condensation when the mercury plummets after sunset.
Proper ventilation is your primary defense against interior moisture. Single-wall tents rely entirely on air exchange to remove the water vapor you produce while sleeping.
Keep all vents open, even in rain. Counterintuitively, open vents often reduce interior moisture more than they let in rain. Most single-wall shelters are designed with storm-proof vents that shed water while allowing airflow.
Maximize the temperature difference between inside and outside air. Hot air rises and escapes through high vents, drawing cooler, drier air in through low openings. This passive convection cycle continuously removes moisture without requiring wind.
Orient your tent door to catch prevailing breezes. I always check wind direction before setting up and position the door as a scoop rather than having wind blow directly into the opening.
Create cross-ventilation whenever possible. If your shelter has multiple vents, position them to encourage air flow-through rather than both facing the same direction. Some hikers stake their tent slightly off-level to improve this effect.
Partial door opening works better than fully open or fully closed in most conditions. A door cracked 4-6 inches creates a controlled draft that exchanges air without creating a wind tunnel. I’ve experimented extensively and found this sweet spot minimizes condensation while staying warm.
Your guy line tension directly affects airflow. Over-tightened sides can pull vents partially closed, while properly tensioned lines maintain the designed ventilation channels. I always check that my vent zippers can fully open after staking out.
Stake height influences interior air volume. Higher pitch creates more headroom and air volume, which dilutes moisture concentration. Some single-wall designs allow you to adjust the pitch height—I go as high as weather permits.
Reduce interior contact points. When your sleeping bag presses against the walls, it creates cold spots that attract condensation and wick moisture directly to your insulation. I position my pad centrally and avoid spreading gear against the sides.
Summer camping allows maximum airflow. I run vents fully open and often sleep with the door unzipped except for bug netting. The warmer temperatures mean less temperature differential and therefore less condensation potential anyway.
Winter requires calculated ventilation. While you want to retain heat, completely sealing your tent guarantees a soaking. I maintain at least some airflow through vents, accepting slightly colder temperatures for drier sleeping conditions.
Shoulder seasons demand constant adjustment. Spring and fall bring wildly varying conditions—I check and adjust my ventilation setup multiple times a night as temperatures and humidity fluctuate.
How you arrange your sleeping system determines whether you wake up dry or damp. Strategic gear placement creates barriers between you and the inevitable condensation that will form.
Never let your sleeping bag touch the tent walls. Fabric contact creates cold spots that attract condensation, and that moisture immediately soaks into your insulation. A wet bag loses loft and warmth, creating a dangerous situation in cold conditions.
I position my sleeping pad centered in the shelter with at least 6 inches of clearance on all sides. This buffer zone prevents bag-to-wall contact while I sleep. After years of practice, I can set up in the dark and still maintain proper spacing.
For more options on moisture-resistant sleep systems, our guide to best camping mattresses covers waterproof models that handle occasional condensation exposure.
Designate specific areas for different gear. Your sleeping area stays central and away from walls, while equipment that can handle moisture goes toward the edges. I place my backpack and boots near the perimeter where condensation collects, keeping my sleep zone protected.
Use your pack as a moisture buffer. Position your backpack vertically against the wall away from your head—it will absorb any dripping condensation before it reaches your sleeping bag. My pack has taken many hits that would have otherwise soaked my down quilt.
Keep moisture sources away from your sleeping area. Wet clothes, damp towels, and rain-soaked gear should go outside the main living area if possible, or at least segregated to one end of the shelter.
Sleep with your head toward the door if ventilation allows. Your breath contains significant moisture, and positioning your head near the most ventilated area helps that humid air escape rather than condense on the ceiling above your face.
I’ve tested head-to-foot versus head-to-door arrangements consistently. The difference isn’t dramatic in mild conditions, but in high-humidity environments, proper head positioning measurably reduces condensation buildup around your face and upper body.
Consider a vapor barrier liner for extreme conditions. VBLs prevent your perspiration from reaching your sleeping bag insulation, but they require specific use techniques and comfort tradeoffs. They’re situational tools, not everyday solutions.
Sometimes condensation is inevitable regardless of your best efforts. The difference between a miserable night and manageable discomfort comes down to how you handle the moisture that does appear.
Wipe down interior walls before sleeping. I carry a small microfiber towel specifically for this purpose. A quick pass over the ceiling and upper walls removes accumulated moisture before it can drip onto your sleeping bag.
The timing matters—do this right before you settle in for the night. Wiping at 9 PM removes the day’s accumulated moisture, giving you the longest possible window before significant buildup occurs again.
Shake out your tent before packing. A vigorous shake removes most surface droplets and prevents them from transferring to your pack and other gear during transport.
I always pack my tent last, allowing maximum drying time. While eating breakfast and breaking camp, I stake the shelter out in any available sun or breeze. Even 15 minutes of exposure significantly reduces moisture content.
Air out your gear at every opportunity. During lunch breaks or long stops, I unpack my sleeping bag and drape it over bushes or rocks. Any evaporation that happens during the day means less moisture to carry into the next night.
Never pack a wet tent long-term. If you must break camp in the rain, set up your shelter at home as soon as possible and let it dry completely before storage. Mold can begin growing within 24-48 hours in damp conditions.
I learned this lesson the hard way after a particularly wet trip on the Olympic Coast. I didn’t dry my tent for three days post-trip, and by the time I unpacked it, small mold colonies had already started. It took multiple cleanings and plenty of sun exposure to fully eliminate.
Store your tent loosely rather than stuffed. The breathable storage sack rather than compression sack gives any residual moisture a chance to escape over time. I also store my tent with all zippers open to maximize airflow during storage.
Every single-wall tent relies on waterproof coatings that come with environmental baggage most campers never consider. The DWR (durable water repellent) treatments and chemical waterproofing that keep you dry have downstream impacts that deserve attention.
PFAS chemicals, commonly called “forever chemicals,” have been standard in outdoor gear waterproofing for decades. These compounds persist indefinitely in the environment, accumulate in wildlife, and have been linked to numerous health concerns. Your condensation-free tent might be shedding microplastics and persistent chemicals with every rainstorm.
Greenwashing Alert: Many brands now market “eco-friendly DWR” or “PFC-free” treatments without transparent information about replacement chemicals. These new formulations may be less studied rather than truly safer. The term “eco-friendly” on gear waterproofing often lacks third-party verification.
The outdoor industry has been slowly moving away from the worst PFAS variants, but replacement chemicals aren’t necessarily better. Short-chain PFAS, fluorinated compounds without “PFOA” labeling, and proprietary formulations often lack independent safety testing. Marketing claims don’t always match environmental reality.
Traditional nylon and polyester with silicone or polyurethane coatings dominate the market. Silnylon offers excellent waterproofing with relatively low chemical impact compared to some alternatives. PU coatings tend to break down faster, requiring more frequent reproofing or replacement.
Dyneema Composite Fabric (DCF) represents an interesting tradeoff. While highly durable and lightweight, DCF involves complex manufacturing with significant energy inputs. Some manufacturers now offer recycled DCF options, but full lifecycle assessments remain limited.
Canvas tents offer a natural alternative with their own sustainability profile. While heavier and requiring different care strategies, traditional canvas can be treated with natural waxes rather than synthetic chemicals. The increased weight reduces transportation efficiency but may extend product lifespan significantly.
Our research on best rain jackets covers similar breathability-waterproofing tradeoffs and the environmental costs of different DWR formulations.
Research brands’ environmental claims critically. Look for specific chemical names rather than vague terms like “eco-friendly.” Independent certifications like BlueSign or Oeko-Tex provide some verification, though they don’t address all concerns.
Consider longevity in your purchasing decisions. A tent that lasts 10 years has a lower annual environmental impact than one requiring replacement every 2-3 seasons. Repairability, warranty support, and fabric durability all factor into sustainability calculations.
The most sustainable tent is often the one you already own. Proper care and maintenance extend product life far beyond the typical replacement cycle. Learning to manage condensation reduces the frustration that drives many hikers to prematurely replace otherwise functional gear.
The choice between single-wall and double-wall tents involves more than weight and condensation. From an environmental perspective, each option has distinct impacts that deserve consideration.
Single-wall tents use less material overall—no separate inner body or rainfly means fewer raw materials and simpler manufacturing. This material reduction translates to lower production emissions and less waste at end-of-life. However, the condensation challenges can lead to earlier replacement for frustrated users.
Double-wall tents require more materials but often last longer due to reduced exposure to direct moisture and UV damage. The inner body protects the main structure, potentially extending usable lifespan. Some best rooftop tents use similar multi-layer construction for durability.
When evaluating tent options through a sustainability lens, consider your typical camping conditions. If you mostly camp in dry western climates where single-wall condensation is manageable, the material savings make sense. For humid environments, a double-wall tent that won’t drive you to premature replacement may ultimately have lower lifetime impact.
Single wall tents struggle significantly in humid environments. The moisture saturation in air provides ample condensation material, and single walls have nowhere for that moisture to go. Many East Coast thru-hikers abandon single walls after experiencing persistent dampness. If you camp primarily in humid regions like the Appalachians or Southeast, a double wall tent will generally perform better.
Yes, wiping down condensation before bed makes a meaningful difference. A quick pass with a microfiber towel removes accumulated moisture that would otherwise drip onto your sleeping bag during the night. Focus on the ceiling and upper walls where gravity will eventually send droplets downward. This simple habit adds about 30 seconds to your bedtime routine but can keep your insulation significantly drier.
Multiple factors contribute: your body releasing about 0.5-1 liter of water per night through breathing and perspiration; ground moisture evaporating from damp soil or vegetation; temperature differential between warm interior air and cold fabric; and lack of airflow trapping humid air inside. High humidity environments, cold nights, and poor ventilation all dramatically increase condensation potential.
Single wall tents perform fine in rain if you maintain proper ventilation. Counterintuitively, keeping vents partially open during rain helps exchange moist interior air for drier exterior air, reducing condensation buildup. Modern single wall designs incorporate storm-proof vents that shed water while allowing airflow. The key is maintaining some air exchange rather than sealing the shelter completely.
Double wall tents handle condensation significantly better. The inner mesh body allows moisture to pass through to the outer rainfly, keeping you dry. Single walls force moisture to condense directly on the fabric you’re touching. However, single walls offer weight savings that matter for long-distance hikers, and with proper techniques, condensation can be managed acceptably in many conditions.
Keep your sleeping bag from touching the tent walls, as fabric contact creates cold spots that attract and transfer moisture. Position your sleeping pad centrally with clearance on all sides. Use your backpack as a moisture buffer between your bag and the walls. Orient your head toward the most ventilated area so your breath moisture can escape rather than condense above your face.
Managing condensation in single-wall tents isn’t about eliminating it entirely—that’s impossible given physics. Instead, success comes from reducing moisture buildup and strategically arranging your gear to handle the condensation that does occur.
The techniques I’ve shared come from hundreds of nights in single-wall shelters across varied conditions. Some nights stay completely dry, others involve strategic wiping and gear positioning. Accepting that some moisture is inevitable makes the whole experience less frustrating.
Your single-wall tent offers legitimate weight savings that matter on long trails. Learning these condensation management strategies lets you enjoy those weight benefits without sacrificing sleep quality or gear longevity. Practice these techniques until they become habit, and you’ll find the right balance for your camping style and climate.